Helix
master branch.
See the usage section for a quick overview of the editor, keymap section for all available keybindings and the configuration section for defining custom keybindings, setting themes, etc. For everything else (e.g., how to install supported language servers), see the Helix Wiki.
Refer the FAQ for common questions.
Installing Helix
The typical way to install Helix is via your operating system’s package manager.
Note that:
-
To get the latest nightly version of Helix, you need to build from source.
-
To take full advantage of Helix, install the language servers for your preferred programming languages. See the wiki for instructions.
Pre-built binaries
Download pre-built binaries from the GitHub Releases page.
The tarball contents include an hx binary and a runtime directory.
To set up Helix:
- Add the
hxbinary to your system’s$PATHto allow it to be used from the command line. - Copy the
runtimedirectory to a location thathxsearches for runtime files. A typical location on Linux/macOS is~/.config/helix/runtime.
To see the runtime directories that hx searches, run hx --health. If necessary, you can override the default runtime location by setting the HELIX_RUNTIME environment variable.
Package Managers
Package managers
![]()
Linux
The following third party repositories are available:
Debian
sudo apt install hx
If you are running a system older than Debian 13, follow the steps for Ubuntu/Mint.
Ubuntu/Mint
Install the Debian package from the release page.
If you are running a system older than Ubuntu 22.04, Mint 21, or Debian 12, you can build the .deb file locally
from source.
Fedora/RHEL
sudo dnf install helix
Arch Linux extra
Releases are available in the extra repository:
sudo pacman -S helix
💡 When installed from the
extrarepository, run Helix withhelixinstead ofhx.For example:
helix --healthto check health
Additionally, a helix-git package is available in the AUR, which builds the master branch.
NixOS
Helix is available in nixpkgs through the helix attribute,
the unstable channel usually carries the latest release.
Helix is also available as a flake in the project
root. Use nix develop to spin up a reproducible development shell. Outputs are
cached for each push to master using Cachix. The
flake is configured to automatically make use of this cache assuming the user
accepts the new settings on first use.
If you are using a version of Nix without flakes enabled,
install Cachix CLI and use
cachix use helix to configure Nix to use cached outputs when possible.
Flatpak
Helix is available on Flathub:
flatpak install flathub com.helix_editor.Helix
flatpak run com.helix_editor.Helix
Snap
Helix is available on Snapcraft and can be installed with:
snap install --classic helix
This will install Helix as both /snap/bin/helix and /snap/bin/hx, so make sure /snap/bin is in your PATH.
AppImage
Install Helix using the Linux AppImage format. Download the official Helix AppImage from the latest releases page.
chmod +x helix-*.AppImage # change permission for executable mode
./helix-*.AppImage # run helix
You can optionally add the .desktop file. Helix must be installed in PATH with the name hx. For example:
mkdir -p "$HOME/.local/bin"
mv helix-*.AppImage "$HOME/.local/bin/hx"
and make sure ~/.local/bin is in your PATH.
Linux Homebrew Core
Checkout the macOS instructions below.
macOS
Homebrew Core
Install the latest release:
brew install helix
Or, install the latest nightly version:
brew install --HEAD helix
MacPorts
sudo port install helix
Windows
Install on Windows using Winget, Scoop, Chocolatey, Packably or MSYS2.
Winget
Windows Package Manager winget command-line tool is by default available on Windows 11 and modern versions of Windows 10 as a part of the App Installer. You can get App Installer from the Microsoft Store. If it’s already installed, make sure it is updated with the latest version.
winget install Helix.Helix
Scoop
scoop install helix
Chocolatey
choco install helix
Packably
packl install helix
MSYS2
For 64-bit Windows 8.1 or above:
pacman -S mingw-w64-ucrt-x86_64-helix
Building from source
Building from source
- Configuring Helix’s runtime files
- Validating the installation
- Configure the desktop shortcut
- Building the Debian package
Requirements:
Clone the Helix GitHub repository into a directory of your choice. The
examples in this documentation assume installation into either ~/src/ on
Linux and macOS, or %userprofile%\src\ on Windows.
- The Rust toolchain
- The Git version control system
- A C++14 compatible compiler to build the tree-sitter grammars, for example GCC or Clang
If you are using the musl-libc standard library instead of glibc the following environment variable must be set during the build to ensure tree-sitter grammars can be loaded correctly:
RUSTFLAGS="-C target-feature=-crt-static"
-
Clone the repository:
git clone https://github.com/helix-editor/helix cd helix -
Compile from source:
# Reproducible
cargo install --path helix-term --locked
# Optimized cargo install \ --profile opt \ --config 'build.rustflags=["-C", "target-cpu=native"]' \ --path helix-term \ --lockedEither command will create the
hxexecutable and construct the tree-sitter grammars in the localruntimefolder.
💡 If you do not want to fetch or build grammars, set an environment variable
HELIX_DISABLE_AUTO_GRAMMAR_BUILD
💡 Tree-sitter grammars can be fetched and compiled if not pre-packaged. Fetch grammars with
hx --grammar fetchand compile them withhx --grammar build. This will install them in theruntimedirectory within the user’s helix config directory (more details below).
💡 If you only want to build some grammars, see
use-grammars
Configuring Helix’s runtime files
Linux and macOS
The runtime directory is one below the Helix source, so either export a
HELIX_RUNTIME environment variable to point to that directory and add it to
your ~/.bashrc or equivalent:
export HELIX_RUNTIME=~/src/helix/runtime
Or, create a symbolic link:
ln -Tsf $PWD/runtime ~/.config/helix/runtime
Windows
Either set the HELIX_RUNTIME environment variable to point to the runtime files using the Windows setting (search for
Edit environment variables for your account) or use the setx command in
Cmd:
setx HELIX_RUNTIME "%userprofile%\src\helix\runtime"
💡
%userprofile%resolves to your user directory likeC:\Users\Your-Name\for example.
Or, create a symlink in %appdata%\helix\ that links to the source code directory:
| Method | Command |
|---|---|
| PowerShell | New-Item -ItemType Junction -Target "runtime" -Path "$Env:AppData\helix\runtime" |
| Cmd | cd %appdata%\helix mklink /D runtime "%userprofile%\src\helix\runtime" |
💡 On Windows, creating a symbolic link may require running PowerShell or Cmd as an administrator.
Multiple runtime directories
When Helix finds multiple runtime directories it will search through them for files in the following order:
runtime/sibling directory to$CARGO_MANIFEST_DIRdirectory (this is intended for developing and testing helix only).runtime/subdirectory of OS-dependent helix user config directory.$HELIX_RUNTIME- Distribution-specific fallback directory (set at compile time—not run time—
with the
HELIX_DEFAULT_RUNTIMEenvironment variable) runtime/subdirectory of path to Helix executable.
This order also sets the priority for selecting which file will be used if multiple runtime directories have files with the same name.
Note to packagers
If you are making a package of Helix for end users, to provide a good out of
the box experience, you should set the HELIX_DEFAULT_RUNTIME environment
variable at build time (before invoking cargo build) to a directory which
will store the final runtime files after installation. For example, say you want
to package the runtime into /usr/lib/helix/runtime. The rough steps a build
script could follow are:
export HELIX_DEFAULT_RUNTIME=/usr/lib/helix/runtimecargo build --profile opt --lockedcp -r runtime $BUILD_DIR/usr/lib/helix/cp target/opt/hx $BUILD_DIR/usr/bin/hx
This way the resulting hx binary will always look for its runtime directory in
/usr/lib/helix/runtime if the user has no custom runtime in ~/.config/helix
or HELIX_RUNTIME.
Validating the installation
To make sure everything is set up as expected you should run the Helix health check:
hx --health
For more information on the health check results refer to Health check.
Configure the desktop shortcut
If your desktop environment supports the
XDG desktop menu
you can configure Helix to show up in the application menu by copying the
provided .desktop and icon files to their correct folders:
cp contrib/Helix.desktop ~/.local/share/applications
cp contrib/helix.png ~/.icons # or ~/.local/share/icons
It is recommended to convert the links in the .desktop file to absolute paths to avoid potential problems:
sed -i -e "s|Exec=hx %F|Exec=$(readlink -f ~/.cargo/bin/hx) %F|g" \
  -e "s|Icon=helix|Icon=$(readlink -f ~/.icons/helix.png)|g" ~/.local/share/applications/Helix.desktop
To use another terminal than the system default, you can modify the .desktop
file. For example, to use kitty:
sed -i "s|Exec=hx %F|Exec=kitty hx %F|g" ~/.local/share/applications/Helix.desktop
sed -i "s|Terminal=true|Terminal=false|g" ~/.local/share/applications/Helix.desktop
Building the Debian package
If the .deb file provided on the release page uses a libc version higher
than that used by your Debian, Ubuntu, or Mint system, you can build the package
from source to match your system’s dependencies.
Install cargo-deb, the tool used for building the .deb file:
cargo install cargo-deb
After cloning and entering the Helix repository as previously described,
use the following command to build the release binary and package it into a .deb file in a single step.
cargo deb -- --locked
💡 This locks you into the
--releaseprofile. But you can also build helix in any way you like. As long as you leave atarget/release/hxfile, it will get packaged withcargo deb --no-build
💡 Don’t worry about the following:
warning: Failed to find dependency specificationCargo deb just reports which packaged files it didn’t derive dependencies for. But so far the dependency deriving seams very good, even if some of the grammar files are skipped.
You can find the resulted .deb in target/debian/. It should contain everything it needs, including the
- completions for bash, fish, zsh
- .desktop file
- icon (though desktop environments might use their own since the name of the package is correctly
helix) - launcher to the binary with the runtime
Using Helix
For a full interactive introduction to Helix, refer to the
tutor which
can be accessed via the command hx --tutor or :tutor.
💡 Currently, not all functionality is fully documented, please refer to the key mappings list.
Modes
Helix is a modal editor, meaning it has different modes for different tasks. The main modes are:
- Normal mode: For navigation and editing commands. This is the default mode.
- Insert mode: For typing text directly into the document. Access by typing
iin normal mode. - Select/extend mode: For making selections and performing operations on them. Access by typing
vin normal mode.
Buffers
Buffers are in-memory representations of files. You can have multiple buffers open at once. Use pickers or commands like :buffer-next and :buffer-previous to open buffers or switch between them.
Selection-first editing
Inspired by Kakoune, Helix follows the selection → action model. This means that whatever you are going to act on (a word, a paragraph, a line, etc.) is selected first and the action itself (delete, change, yank, etc.) comes second. A cursor is simply a single width selection.
Multiple selections
Also inspired by Kakoune, multiple selections are a core mode of interaction in Helix. For example, the standard way of replacing multiple instances of a word is to first select all instances (so there is one selection per instance) and then use the change action (c) to edit them all at the same time.
Motions
Motions are commands that move the cursor or modify selections. They’re used for navigation and text manipulation. Examples include w to move to the next word, or f to find a character. See the Movement section of the keymap for more motions.
Registers
Registers
In Helix, registers are storage locations for text and other data, such as the
result of a search. Registers can be used to cut, copy, and paste text, similar
to the clipboard in other text editors. Usage is similar to Vim, with " being
used to select a register.
User-defined registers
Helix allows you to create your own named registers for storing text, for example:
"ay- Yank the current selection to registera."op- Paste the text in registeroafter the selection.
If a register is selected before invoking a change or delete command, the selection will be stored in the register and the action will be carried out:
"hc- Store the selection in registerhand then change it (delete and enter insert mode)."md- Store the selection in registermand delete it.
Default registers
Commands that use registers, like yank (y), use a default register if none is specified.
These registers are used as defaults:
| Register character | Contains |
|---|---|
/ | Last search |
: | Last executed command |
" | Last yanked text |
@ | Last recorded macro |
Special registers
Some registers have special behavior when read from and written to.
| Register character | When read | When written |
|---|---|---|
_ | No values are returned | All values are discarded |
# | Selection indices (first selection is 1, second is 2, etc.) | This register is not writable |
. | Contents of the current selections | This register is not writable |
% | Name of the current file | This register is not writable |
+ | Reads from the system clipboard | Joins and yanks to the system clipboard |
* | Reads from the primary clipboard | Joins and yanks to the primary clipboard |
When yanking multiple selections to the clipboard registers, the selections are joined with newlines. Pasting from these registers will paste multiple selections if the clipboard was last yanked to by the Helix session. Otherwise the clipboard contents are pasted as one selection.
Surround
Surround
Helix includes built-in functionality similar to vim-surround. The keymappings have been inspired from vim-sandwich:
| Key Sequence | Action |
|---|---|
ms<char> (after selecting text) | Add surround characters to selection |
mr<char_to_replace><new_char> | Replace the closest surround characters |
md<char_to_delete> | Delete the closest surround characters |
You can use counts to act on outer pairs.
Surround can also act on multiple selections. For example, to change every occurrence of (use) to [use]:
%to select the whole filesto split the selections on a search term- Input
useand hit Enter mr([to replace the parentheses with square brackets
Multiple characters are currently not supported, but planned for future release.
Textobjects
Selecting and manipulating text with textobjects
In Helix, textobjects are a way to select, manipulate and operate on a piece of text in a structured way. They allow you to refer to blocks of text based on their structure or purpose, such as a word, sentence, paragraph, or even a function or block of code.

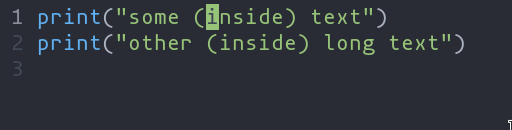
ma- Select around the object (vain Vim,<alt-a>in Kakoune)mi- Select inside the object (viin Vim,<alt-i>in Kakoune)
Key after mi or ma | Textobject selected |
|---|---|
w | Word |
W | WORD |
p | Paragraph |
(, [, ', etc. | Specified surround pairs |
m | The closest surround pair |
f | Function |
t | Type (or Class) |
a | Argument/parameter |
c | Comment |
T | Test |
g | Change |
x | (X)HTML element |
💡
f,t, etc. need a tree-sitter grammar active for the current document and a special tree-sitter query file to work properly. Only some grammars currently have the query file implemented. Contributions are welcome!
Navigating using tree-sitter textobjects
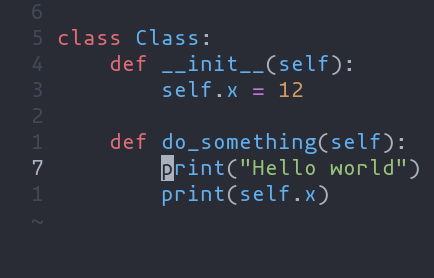
Navigating between functions, classes, parameters, and other elements is
possible using tree-sitter and textobject queries. For
example to move to the next function use ]f, to move to previous
type use [t, and so on.

For the full reference see the unimpaired section of the key bind documentation.
💡 This feature relies on tree-sitter textobjects and requires the corresponding query file to work properly.
Syntax aware motions
Moving the selection with syntax-aware motions
Alt-p, Alt-o, Alt-i, and Alt-n (or Alt and arrow keys) allow you to move the
selection according to its location in the syntax tree. For example, many languages have the
following syntax for function calls:
func(arg1, arg2, arg3);
A function call might be parsed by tree-sitter into a tree like the following.
(call
  function: (identifier) ; func
  arguments:
    (arguments           ; (arg1, arg2, arg3)
      (identifier)       ; arg1
      (identifier)       ; arg2
      (identifier)))     ; arg3
Use :tree-sitter-subtree to view the syntax tree of the primary selection. In
a more intuitive tree format:
            ┌────┐
            │call│
      ┌─────┴────┴─────┐
      │                │
┌─────▼────┐      ┌────▼────┐
│identifier│      │arguments│
│  "func"  │ ┌────┴───┬─────┴───┐
└──────────┘ │        │         │
             │        │         │
   ┌─────────▼┐  ┌────▼─────┐  ┌▼─────────┐
   │identifier│  │identifier│  │identifier│
   │  "arg1"  │  │  "arg2"  │  │  "arg3"  │
   └──────────┘  └──────────┘  └──────────┘
If you have a selection that wraps arg1 (see the tree above), and you use
Alt-n, it will select the next sibling in the syntax tree: arg2.
// before
func([arg1], arg2, arg3)
// after
func(arg1, [arg2], arg3);
Similarly, Alt-o will expand the selection to the parent node, in this case, the
arguments node.
func[(arg1, arg2, arg3)];
There is also some nuanced behavior that prevents you from getting stuck on a
node with no sibling. When using Alt-p with a selection on arg1, the previous
child node will be selected. In the event that arg1 does not have a previous
sibling, the selection will move up the syntax tree and select the previous
element. As a result, using Alt-p with a selection on arg1 will move the
selection to the “func” identifier.
Pickers
Using pickers
Helix has a variety of pickers, which are interactive windows used to select various kinds of items. These include a file picker, global search picker, and more. Most pickers are accessed via keybindings in space mode. Pickers have their own keymap for navigation.
Filtering Picker Results
Most pickers perform fuzzy matching using fzf syntax. Two exceptions are the global search picker, which uses regex, and the workspace symbol picker, which passes search terms to the language server. Note that OR operations (|) are not currently supported.
If a picker shows multiple columns, you may apply the filter to a specific column by prefixing the column name with %. Column names can be shortened to any prefix, so %p, %pa or %pat all mean the same as %path. For example, a query of helix %p .toml !lang in the global search picker searches for the term “helix” within files with paths ending in “.toml” but not including “lang”.
You can insert the contents of a register using Ctrl-r followed by a register name. For example, one could insert the currently selected text using Ctrl-r-., or the directory of the current file using Ctrl-r-% followed by Ctrl-w to remove the last path section. The global search picker will use the contents of the search register if you press Enter without typing a filter. For example, pressing *-Space-/-Enter will start a global search for the currently selected text.
File explorer
Space-e opens an interactive file explorer for browsing and opening files, rooted at the workspace; Space-. opens one rooted at the current buffer’s directory. Unlike the file picker, the explorer does not ignore most files by default; its ignore behaviour is configured separately in the [editor.file-explorer] section.
Jumplist
Using the jumplist
To help with quick navigation, Helix maintains a list of “jumps” called the jumplist.
Whenever you make a significant movement (see next section), Helix stores your selections from before the move as a jump.
A jump serves as a kind of checkpoint, allowing you to jump to a separate location, make edits, and return to where you were with your previous selections.
This way, the jumplist tracks both your previous location and your selections.
You can manually save a jump by using Ctrl-s.
To jump backward in the jumplist, use Ctrl-o; to go forward, use Ctrl-i. To view and select from the full jumplist, use Space-j to open the jumplist picker.
What makes a jump
The following is a non-exhaustive list of which actions add a jump to the jumplist:
- Switching buffers
- Using the buffer picker, going to the next/previous buffer
- Going to the last accessed/modified file
- Making a new file (
:new FILE) - Opening a file (
:open FILE)- Includes
:log-open,:config-open,:config-open-workspace,:tutor
- Includes
- Navigating by pickers, global search, or the file explorer
goto_file(gf)
- Big in-file movements
select_regex(s)split_regex(S)search(/)keep_selectionsandremove_selections(Kand<A-K>)goto_file_start(gg)goto_file_endgoto_last_line(ge):goto 123/:123/123Ggoto_definition(gd)goto_declaration(gD)goto_type_definition(gy)goto_reference(gr)
- Other
Ctrl-smanually creates a jump- Trying to close a modified buffer can switch you to that buffer and create a jump
- The debugger can create jumps as you jump stack frames
Keymap
Keymap
💡 Mappings marked (LSP) require an active language server for the file.
💡 Mappings marked (TS) require a tree-sitter grammar for the file type.
⚠️ Some terminals’ default key mappings conflict with Helix’s. If any of the mappings described on this page do not work as expected, check your terminal’s mappings to ensure they do not conflict. See the wiki for known conflicts.
Normal mode
Normal mode is the default mode when you launch helix. You can return to it from other modes by pressing the Escape key.
Movement
NOTE: Unlike Vim,
f,F,tandTare not confined to the current line.
Hereafter,
<n>represents an integer by typing a sequence of digits.
| Key | Description | Command |
|---|---|---|
h, Left | Move left | move_char_left |
j, Down | Move down | move_visual_line_down |
k, Up | Move up | move_visual_line_up |
l, Right | Move right | move_char_right |
w | Move next word start | move_next_word_start |
b | Move previous word start | move_prev_word_start |
e | Move next word end | move_next_word_end |
W | Move next WORD start | move_next_long_word_start |
B | Move previous WORD start | move_prev_long_word_start |
E | Move next WORD end | move_next_long_word_end |
t | Find till next char | find_till_char |
f | Find next char | find_next_char |
T | Find till previous char | till_prev_char |
F | Find previous char | find_prev_char |
<n>G, <n>gg | Go to line number <n> | goto_line |
Alt-. | Repeat last motion (f, t, m, [ or ]) | repeat_last_motion |
Home | Move to the start of the line | goto_line_start |
End | Move to the end of the line | goto_line_end |
Ctrl-b, PageUp | Move page up | page_up |
Ctrl-f, PageDown | Move page down | page_down |
Ctrl-u | Move cursor and page half page up | page_cursor_half_up |
Ctrl-d | Move cursor and page half page down | page_cursor_half_down |
Ctrl-i | Jump forward on the jumplist | jump_forward |
Ctrl-o | Jump backward on the jumplist | jump_backward |
Ctrl-s | Save the current selection to the jumplist | save_selection |
Changes
| Key | Description | Command |
|---|---|---|
r | Replace with a character | replace |
R | Replace with yanked text | replace_with_yanked |
~ | Switch case of the selected text | switch_case |
` | Set the selected text to lower case | switch_to_lowercase |
Alt-` | Set the selected text to upper case | switch_to_uppercase |
i | Insert before selection | insert_mode |
a | Insert after selection (append) | append_mode |
I | Insert at the start of the line | insert_at_line_start |
A | Insert at the end of the line | insert_at_line_end |
o | Open new line below selection | open_below |
O | Open new line above selection | open_above |
. | Repeat last insert | N/A |
u | Undo change | undo |
U | Redo change | redo |
Alt-u | Move backward in history | earlier |
Alt-U | Move forward in history | later |
y | Yank selection | yank |
p | Paste after selection | paste_after |
P | Paste before selection | paste_before |
" <reg> | Select a register to yank to or paste from | select_register |
> | Indent selection | indent |
< | Unindent selection | unindent |
= | Format selection (LSP) | format_selections |
d | Delete selection | delete_selection |
Alt-d | Delete selection, without yanking | delete_selection_noyank |
c | Change selection (delete and enter insert mode) | change_selection |
Alt-c | Change selection (delete and enter insert mode, without yanking) | change_selection_noyank |
Ctrl-a | Increment object (number) under cursor | increment |
Ctrl-x | Decrement object (number) under cursor | decrement |
Q | Start/stop macro recording to the selected register (experimental) | record_macro |
q | Play back a recorded macro from the selected register (experimental) | replay_macro |
Ctrl-z | Suspend Helix and return to the shell (resume with fg) | suspend |
Shell
| Key | Description | Command |
|---|---|---|
| | Pipe each selection through shell command, replacing with output | shell_pipe |
Alt-| | Pipe each selection into shell command, ignoring output | shell_pipe_to |
! | Run shell command, inserting output before each selection | shell_insert_output |
Alt-! | Run shell command, appending output after each selection | shell_append_output |
$ | Pipe each selection into shell command, keep selections where command returned 0 | shell_keep_pipe |
Selection manipulation
| Key | Description | Command |
|---|---|---|
s | Select all regex matches inside selections | select_regex |
S | Split selection into sub selections on regex matches | split_selection |
Alt-s | Split selection on newlines | split_selection_on_newline |
Alt-minus | Merge selections | merge_selections |
Alt-_ | Merge consecutive selections | merge_consecutive_selections |
& | Align selection in columns | align_selections |
_ | Trim whitespace from the selection | trim_selections |
; | Collapse selection onto a single cursor | collapse_selection |
Alt-; | Flip selection cursor and anchor | flip_selections |
Alt-: | Ensures the selection is in forward direction | ensure_selections_forward |
, | Keep only the primary selection | keep_primary_selection |
Alt-, | Remove the primary selection | remove_primary_selection |
C | Copy selection onto the next line (Add cursor below) | copy_selection_on_next_line |
Alt-C | Copy selection onto the previous line (Add cursor above) | copy_selection_on_prev_line |
( | Rotate main selection backward | rotate_selections_backward |
) | Rotate main selection forward | rotate_selections_forward |
Alt-( | Rotate selection contents backward | rotate_selection_contents_backward |
Alt-) | Rotate selection contents forward | rotate_selection_contents_forward |
% | Select entire file | select_all |
x | Select current line, if already selected, extend to next line | extend_line_below |
X | Extend selection to line bounds (line-wise selection) | extend_to_line_bounds |
Alt-x | Shrink selection to line bounds (line-wise selection) | shrink_to_line_bounds |
J | Join lines inside selection | join_selections |
Alt-J | Join lines inside selection and select the inserted space | join_selections_space |
K | Keep selections matching the regex | keep_selections |
Alt-K | Remove selections matching the regex | remove_selections |
Ctrl-c | Comment/uncomment the selections | toggle_comments |
Alt-o, Alt-up | Expand selection to parent syntax node (TS) | expand_selection |
Alt-i, Alt-down | Shrink syntax tree object selection (TS) | shrink_selection |
Alt-p, Alt-left | Select previous sibling node in syntax tree (TS) | select_prev_sibling |
Alt-n, Alt-right | Select next sibling node in syntax tree (TS) | select_next_sibling |
Alt-a | Select all sibling nodes in syntax tree (TS) | select_all_siblings |
Alt-I, Alt-Shift-down | Select all children nodes in syntax tree (TS) | select_all_children |
Alt-e | Move to end of parent node in syntax tree (TS) | move_parent_node_end |
Alt-b | Move to start of parent node in syntax tree (TS) | move_parent_node_start |
Search
Search commands all operate on the / register by default. To use a different register, use "<char>.
| Key | Description | Command |
|---|---|---|
/ | Search for regex pattern | search |
? | Search for previous pattern | rsearch |
n | Select next search match | search_next |
N | Select previous search match | search_prev |
* | Use current selection as the search pattern, automatically wrapping with \b on word boundaries | search_selection_detect_word_boundaries |
Alt-* | Use current selection as the search pattern | search_selection |
Minor modes
These sub-modes are accessible from normal mode and typically switch back to normal mode after a command.
| Key | Description | Command |
|---|---|---|
v | Enter select (extend) mode | select_mode |
g | Enter goto mode | N/A |
m | Enter match mode | N/A |
: | Enter command mode | command_mode |
z | Enter view mode | N/A |
Z | Enter sticky view mode | N/A |
Ctrl-w | Enter window mode | N/A |
Space | Enter space mode | N/A |
These modes (except command mode) can be configured by remapping keys.
View mode
Accessed by typing z in normal mode.
View mode is intended for scrolling and manipulating the view without changing
the selection. The “sticky” variant of this mode (accessed by typing Z in
normal mode) is persistent and can be exited using the escape key. This is
useful when you’re simply looking over text and not actively editing it.
| Key | Description | Command |
|---|---|---|
z, c | Vertically center the line | align_view_center |
t | Align the line to the top of the screen | align_view_top |
b | Align the line to the bottom of the screen | align_view_bottom |
m | Align the line to the middle of the screen (horizontally) | align_view_middle |
j, down | Scroll the view downwards | scroll_down |
k, up | Scroll the view upwards | scroll_up |
Ctrl-f, PageDown | Move page down | page_down |
Ctrl-b, PageUp | Move page up | page_up |
Ctrl-u | Move cursor and page half page up | page_cursor_half_up |
Ctrl-d | Move cursor and page half page down | page_cursor_half_down |
Goto mode
Accessed by typing g in normal mode.
Jumps to various locations.
| Key | Description | Command |
|---|---|---|
<n>g | Go to line number <n> | goto_file_start |
g | Go to the start of the file | goto_file_start |
<n>| | Go to column number <n> | goto_column |
| | Go to the start of line | goto_column |
e | Go to the end of the file | goto_last_line |
f | Go to files/URLs in selections | goto_file |
h | Go to the start of the line | goto_line_start |
l | Go to the end of the line | goto_line_end |
s | Go to first non-whitespace character of the line | goto_first_nonwhitespace |
t | Go to the top of the screen | goto_window_top |
c | Go to the middle of the screen | goto_window_center |
b | Go to the bottom of the screen | goto_window_bottom |
d | Go to definition (LSP) | goto_definition |
D | Go to declaration (LSP) | goto_declaration |
y | Go to type definition (LSP) | goto_type_definition |
r | Go to references (LSP) | goto_reference |
i | Go to implementation (LSP) | goto_implementation |
a | Go to the last accessed/alternate file | goto_last_accessed_file |
m | Go to the last modified/alternate file | goto_last_modified_file |
n | Go to next buffer | goto_next_buffer |
p | Go to previous buffer | goto_previous_buffer |
. | Go to last modification in current file | goto_last_modification |
j | Move down textual (instead of visual) line | move_line_down |
k | Move up textual (instead of visual) line | move_line_up |
w | Show labels at each word and select the word that belongs to the entered labels | goto_word |
Match mode
Accessed by typing m in normal mode.
Please refer to the relevant sections for detailed explanations about surround and textobjects.
| Key | Description | Command |
|---|---|---|
m | Goto matching bracket (TS) | match_brackets |
s <char> | Surround current selection with <char> | surround_add |
r <from><to> | Replace surround character <from> with <to> | surround_replace |
d <char> | Delete surround character <char> | surround_delete |
a <object> | Select around textobject | select_textobject_around |
i <object> | Select inside textobject | select_textobject_inner |
TODO: Mappings for selecting syntax nodes (a superset of [).
Window mode
Accessed by typing Ctrl-w in normal mode.
This layer is similar to Vim keybindings as Kakoune does not support windows.
| Key | Description | Command |
|---|---|---|
w, Ctrl-w | Switch to next window | rotate_view |
v, Ctrl-v | Vertical right split | vsplit |
s, Ctrl-s | Horizontal bottom split | hsplit |
t, Ctrl-t | Transpose the two adjacent splits | transpose_view |
f | Go to files/URLs in selections in horizontal splits | goto_file_hsplit |
F | Go to files/URLs in selections in vertical splits | goto_file_vsplit |
h, Ctrl-h, Left | Move to left split | jump_view_left |
j, Ctrl-j, Down | Move to split below | jump_view_down |
k, Ctrl-k, Up | Move to split above | jump_view_up |
l, Ctrl-l, Right | Move to right split | jump_view_right |
q, Ctrl-q | Close current window | wclose |
o, Ctrl-o | Only keep the current window, closing all the others | wonly |
H | Swap window to the left | swap_view_left |
J | Swap window downwards | swap_view_down |
K | Swap window upwards | swap_view_up |
L | Swap window to the right | swap_view_right |
ns, nCtrl-s | New horizontal split with a scratch buffer | hsplit_new |
nv, nCtrl-v | New vertical split with a scratch buffer | vsplit_new |
Space mode
Accessed by typing Space in normal mode.
This layer is a kludge of mappings, mostly pickers.
| Key | Description | Command |
|---|---|---|
f | Open file picker at LSP workspace root | file_picker |
F | Open file picker at current working directory | file_picker_in_current_directory |
e | Open file explorer at workspace root | file_explorer |
. | Open file explorer at current buffer’s directory | file_explorer_in_current_buffer_directory |
b | Open buffer picker | buffer_picker |
j | Open jumplist picker | jumplist_picker |
g | Open changed file picker | changed_file_picker |
G | Debug (experimental) | N/A |
k | Show documentation for item under cursor in a popup (LSP) | hover |
s | Open document symbol picker (LSP or TS) | lsp_or_syntax_symbol_picker |
S | Open workspace symbol picker (LSP or TS) | lsp_or_syntax_workspace_symbol_picker |
d | Open document diagnostics picker (LSP) | diagnostics_picker |
D | Open workspace diagnostics picker (LSP) | workspace_diagnostics_picker |
r | Rename symbol (LSP) | rename_symbol |
a | Apply code action (LSP) | code_action |
h | Select symbol references (LSP) | select_references_to_symbol_under_cursor |
' | Open last fuzzy picker | last_picker |
w | Enter window mode | N/A |
c | Comment/uncomment selections | toggle_comments |
C | Block comment/uncomment selections | toggle_block_comments |
Alt-c | Line comment/uncomment selections | toggle_line_comments |
p | Paste system clipboard after selections | paste_clipboard_after |
P | Paste system clipboard before selections | paste_clipboard_before |
y | Yank selections to clipboard | yank_to_clipboard |
Y | Yank main selection to clipboard | yank_main_selection_to_clipboard |
R | Replace selections by clipboard contents | replace_selections_with_clipboard |
/ | Global search in workspace folder | global_search |
? | Open command palette | command_palette |
💡 Global search displays results in a fuzzy picker, use
Space + 'to bring it back up after opening a file.
Popup
Displays documentation for item under cursor. Remapping currently not supported.
| Key | Description |
|---|---|
Ctrl-u | Scroll up |
Ctrl-d | Scroll down |
Completion Menu
Displays documentation for the selected completion item. Remapping currently not supported.
| Key | Description |
|---|---|
Shift-Tab, Ctrl-p, Up | Previous entry |
Tab, Ctrl-n, Down | Next entry |
Enter | Close menu and accept completion |
Ctrl-c | Close menu and reject completion |
Any other keypresses result in the completion being accepted.
Signature-help Popup
Displays the signature of the selected completion item. Remapping currently not supported.
| Key | Description |
|---|---|
Alt-p | Previous signature |
Alt-n | Next signature |
Unimpaired
These mappings are in the style of vim-unimpaired.
| Key | Description | Command |
|---|---|---|
]d | Go to next diagnostic (LSP) | goto_next_diag |
[d | Go to previous diagnostic (LSP) | goto_prev_diag |
]D | Go to last diagnostic in document (LSP) | goto_last_diag |
[D | Go to first diagnostic in document (LSP) | goto_first_diag |
]f | Go to next function (TS) | goto_next_function |
[f | Go to previous function (TS) | goto_prev_function |
]t | Go to next type definition (TS) | goto_next_class |
[t | Go to previous type definition (TS) | goto_prev_class |
]a | Go to next argument/parameter (TS) | goto_next_parameter |
[a | Go to previous argument/parameter (TS) | goto_prev_parameter |
]c | Go to next comment (TS) | goto_next_comment |
[c | Go to previous comment (TS) | goto_prev_comment |
]e | Go to next entry (TS) | goto_next_entry |
[e | Go to previous entry (TS) | goto_prev_entry |
]T | Go to next test (TS) | goto_next_test |
[T | Go to previous test (TS) | goto_prev_test |
]p | Go to next paragraph | goto_next_paragraph |
[p | Go to previous paragraph | goto_prev_paragraph |
]g | Go to next change | goto_next_change |
[g | Go to previous change | goto_prev_change |
]G | Go to last change | goto_last_change |
[G | Go to first change | goto_first_change |
[x | Go to next (X)HTML element | goto_next_xml_element |
]x | Go to previous (X)HTML element | goto_prev_xml_element |
]Space | Add newline below | add_newline_below |
[Space | Add newline above | add_newline_above |
Insert mode
Accessed by typing i in normal mode.
Insert mode bindings are minimal by default. Helix is designed to be a modal editor, and this is reflected in the user experience and internal mechanics. Changes to the text are only saved for undos when escaping from insert mode to normal mode.
💡 New users are strongly encouraged to learn the modal editing paradigm to get the smoothest experience.
| Key | Description | Command |
|---|---|---|
Escape | Switch to normal mode | normal_mode |
Ctrl-s | Commit undo checkpoint | commit_undo_checkpoint |
Ctrl-x | Autocomplete | completion |
Ctrl-r | Insert a register content | insert_register |
Ctrl-w, Alt-Backspace | Delete previous word | delete_word_backward |
Alt-d, Alt-Delete | Delete next word | delete_word_forward |
Ctrl-u | Delete to start of line | kill_to_line_start |
Ctrl-k | Delete to end of line | kill_to_line_end |
Ctrl-h, Backspace, Shift-Backspace | Delete previous char | delete_char_backward |
Ctrl-d, Delete | Delete next char | delete_char_forward |
Ctrl-j, Enter | Insert new line | insert_newline |
Tab | Smart tab (configurable) | smart_tab |
Shift-Tab | Insert tab | insert_tab |
These keys are not recommended, but are included for new users less familiar with modal editors.
| Key | Description | Command |
|---|---|---|
Up | Move to previous line | move_line_up |
Down | Move to next line | move_line_down |
Left | Backward a char | move_char_left |
Right | Forward a char | move_char_right |
PageUp | Move one page up | page_up |
PageDown | Move one page down | page_down |
Home | Move to line start | goto_line_start |
End | Move to line end | goto_line_end_newline |
As you become more comfortable with modal editing, you may want to disable some
insert mode bindings. You can do this by editing your config.toml file.
[keys.insert]
up = "no_op"
down = "no_op"
left = "no_op"
right = "no_op"
pageup = "no_op"
pagedown = "no_op"
home = "no_op"
end = "no_op"
Select / extend mode
Accessed by typing v in normal mode.
Select mode echoes Normal mode, but changes any movements to extend
selections rather than replace them. Goto motions are also changed to
extend, so that vgl, for example, extends the selection to the end of
the line.
Search is also affected. By default, n and N will remove the current
selection and select the next instance of the search term. Toggling this
mode before pressing n or N makes it possible to keep the current
selection. Toggling it on and off during your iterative searching allows
you to selectively add search terms to your selections.
Picker
Keys to use within picker. Remapping currently not supported. See the documentation page on pickers for more info. Prompt keybinds also work in pickers, except where they conflict with picker keybinds.
| Key | Description |
|---|---|
Shift-Tab, Up, Ctrl-p | Previous entry |
Tab, Down, Ctrl-n | Next entry |
PageUp, Ctrl-u | Page up |
PageDown, Ctrl-d | Page down |
Home | Go to first entry |
End | Go to last entry |
Enter | Open selected |
Alt-Enter | Open selected in the background without closing the picker |
Ctrl-s | Open horizontally |
Ctrl-v | Open vertically |
Ctrl-t | Toggle preview |
Escape, Ctrl-c | Close picker |
Prompt
Keys to use within prompt, Remapping currently not supported.
| Key | Description |
|---|---|
Escape, Ctrl-c | Close prompt |
Alt-b, Ctrl-Left | Backward a word |
Ctrl-b, Left | Backward a char |
Alt-f, Ctrl-Right | Forward a word |
Ctrl-f, Right | Forward a char |
Ctrl-e, End | Move prompt end |
Ctrl-a, Home | Move prompt start |
Ctrl-w, Alt-Backspace, Ctrl-Backspace | Delete previous word |
Alt-d, Alt-Delete, Ctrl-Delete | Delete next word |
Ctrl-u | Delete to start of line |
Ctrl-k | Delete to end of line |
Backspace, Ctrl-h, Shift-Backspace | Delete previous char |
Delete, Ctrl-d | Delete next char |
Ctrl-s | Insert a word under doc cursor, may be changed to Ctrl-r Ctrl-w later |
Ctrl-p, Up | Select previous history |
Ctrl-n, Down | Select next history |
Ctrl-r | Insert the content of the register selected by following input char |
Tab | Select next completion item |
BackTab | Select previous completion item |
Enter | Open selected |
Command line
The command line is used for executing typable commands like :write or :quit. Press : to activate the command line.
Typable commands optionally accept arguments. :write for example accepts an optional path to write the file contents. The command line also supports a quoting syntax for arguments, flags to modify command behaviors, and expansions - a way to insert values from the editor. Most commands support these features but some have custom parsing rules (see the exceptions below).
Quoting
By default, command arguments are split on tabs and space characters. :open README.md CHANGELOG.md for example should open two files, README.md and CHANGELOG.md. Arguments that contain spaces can be surrounded in single quotes (') or backticks (`) to prevent the space from separating the argument, like :open 'a b.txt'.
Double quotes may be used the same way, but double quotes expand their inner content. :echo "%{cursor_line}" for example may print 1 because of the expansion for the cursor_line variable. :echo '%{cursor_line}' though prints %{cursor_line} literally: content within single quotes or backticks is interpreted as-is.
On Unix systems the backslash character may be used to escape certain characters depending on where it is used. Within an argument which isn’t surround in quotes, the backslash can be used to escape the space or tab characters: :open a\ b.txt is equivalent to :open 'a b.txt'. The backslash may also be used to escape quote characters (', `, ") or the percent token (%) when used at the beginning of an argument. :echo \%sh{foo} for example prints %sh{foo} instead of invoking a foo shell command and :echo \"quote prints "quote. The backslash character is treated literally in any other situation on Unix systems and always on Windows: :echo \n always prints \n.
Flags
Command flags are optional switches that can be used to alter the behavior of a command. For example the :sort command accepts an optional --reverse (or -r for short) flag which causes the sort command to reverse the sorting direction. Typing the - character shows completions for the current command’s flags, if any.
The -- flag specifies the end of flags. All arguments after -- are treated as positional arguments: :open -- -a.txt opens a file called -a.txt.
Expansions
Expansions are patterns that Helix recognizes and replaces within the command line. Helix recognizes anything starting with a percent token (%) as an expansion, for example %sh{echo hi!}. Expansions are particularly useful when used in commands like :echo or :noop for executing simple scripts. For example:
[keys.normal]
# Print the current line's git blame information to the statusline.
space.B = ":echo %sh{git blame -L %{cursor_line},+1 %{buffer_name}}"
Expansions take the form %[<kind>]<open><contents><close>. In %sh{echo hi!}, for example, the kind is sh - the shell expansion - and the contents are “echo hi!”, with { and } acting as opening and closing delimiters. The following open/close characters are recognized as expansion delimiter pairs: (/), [/], {/} and </>. Plus the single characters ', " or | may be used instead: %{cursor_line} is equivalent to %<cursor_line>, %[cursor_line] or %|cursor_line|.
To escape a percent character instead of treating it as an expansion, use two percent characters consecutively. To execute a shell command like date -u +'%Y-%m-%d', double the percent characters: :echo %sh{date -u +'%%Y-%%m-%%d'}.
When no <kind> is provided, Helix will expand a variable. For example %{cursor_line} can be used as in argument to insert the line number. :echo %{cursor_line} for instance may print 1 to the statusline.
The following variables are supported:
| Name | Description |
|---|---|
cursor_line | The line number of the primary cursor in the currently focused document, starting at 1. |
cursor_column | The column number of the primary cursor in the currently focused document, starting at 1. This is counted as the number of grapheme clusters from the start of the line rather than bytes or codepoints. |
buffer_name | The relative path of the currently focused document. [scratch] is expanded instead for scratch buffers. |
file_path_absolute | The absolute path of the currently focused document. For scratch buffers this will default to the current working directory. |
line_ending | A string containing the line ending of the currently focused document. For example on Unix systems this is usually a line-feed character (\n) but on Windows systems this may be a carriage-return plus a line-feed (\r\n). The line ending kind of the currently focused document can be inspected with the :line-ending command. |
current_working_directory | Current working directory |
workspace_directory | Nearest ancestor directory of the current working directory that contains .git, .svn, jj or .helix |
language | A string containing the language name of the currently focused document. |
selection | A string containing the contents of the primary selection of the currently focused document. |
selection_line_start | The line number of the start of the primary selection in the currently focused document, starting at 1. |
selection_line_end | The line number of the end of the primary selection in the currently focused document, starting at 1. |
Aside from editor variables, the following expansions may be used:
- Unicode
%u{..}. The contents may contain up to six hexadecimal numbers corresponding to a Unicode codepoint value. For example:echo %u{25CF}prints●to the statusline. - Shell
%sh{..}. The contents are passed to the configured shell command. For example:echo %sh{echo "20 * 5" | bc}may print100on the statusline on when using a shell withechoand thebccalculator installed. Shell expansions are evaluated recursively.%sh{echo '%{buffer_name}:%{cursor_line}'}for example executes a command likeecho 'README.md:1': the variables within the%sh{..}expansion are evaluated before executing the shell command. - Register
%reg{..}. The contents should be a single character representing the register name. For example,:set-register a hello worldfollowed byecho %reg{a}printshello worldto the statusline.
As mentioned above, double quotes can be used to surround arguments containing spaces but also support expansions within the quoted content unlike single quotes or backticks. For example :echo "circle: %u{25CF}" prints circle: ● to the statusline while :echo 'circle: %u{25CF}' prints circle: %u{25CF}.
Note that expansions are only evaluated once the Enter key is pressed in command mode.
Exceptions
The following commands support expansions but otherwise pass the given argument directly to the shell program without interpreting quotes:
:insert-output:append-output:pipe:pipe-to:run-shell-command
For example executing :sh echo "%{buffer_name}:%{cursor_column}" would pass text like echo "README.md:1" as an argument to the shell program: the expansions are evaluated but not the quotes. As mentioned above, percent characters can be used in shell commands by doubling the percent character. To insert the output of a command like date -u +'%Y-%m-%d' use :insert-output date -u +'%%Y-%%m-%%d'.
The :set-option and :toggle-option commands use regular parsing for the first argument - the config option name - and parse the rest depending on the config option’s type. :set-option interprets the second argument as a string for string config options and parses everything else as JSON.
:toggle-option’s behavior depends on the JSON type of the config option supplied as the first argument:
- Booleans: only the config option name should be provided. For example
:toggle-option auto-formatwill flip theauto-formatoption. - Strings: the rest of the command line is parsed with regular quoting rules. For example
:toggle-option indent-heuristic hybrid tree-sitter simplecycles through “hybrid”, “tree-sitter” and “simple” values on each invocation of the command. - Numbers, arrays and objects: the rest of the command line is parsed as a stream of JSON values. For example
:toggle-option rulers [81] [51, 73]cycles through[81]and[51, 73].
When providing multiple values to :toggle-option there should be no duplicates. :toggle-option indent-heuristic hybrid simple tree-sitter simple for example would only toggle between “hybrid” and “tree-sitter” values.
:lsp-workspace-command works similarly to :toggle-option. The first argument (if present) is parsed according to normal rules. The rest of the line is parsed as JSON values. Unlike :toggle-option, string arguments for a command must be quoted. For example :lsp-workspace-command lsp.Command "foo" "bar".
Commands
Typable commands
Typable commands are used from command mode and may take arguments. Command mode can be activated by pressing :. The built-in typable commands are:
| Name | Description |
|---|---|
:exit, :x, :xit | Write changes to disk if the buffer is modified and then quit. Accepts an optional path (:exit some/path.txt). |
:exit!, :x!, :xit! | Force write changes to disk, creating necessary subdirectories, if the buffer is modified and then quit. Accepts an optional path (:exit! some/path.txt). |
:quit, :q | Close the current view. |
:quit!, :q! | Force close the current view, ignoring unsaved changes. |
:open, :o, :edit, :e | Open a file from disk into the current view. |
:buffer-close, :bc, :bclose | Close the current buffer. |
:buffer-close!, :bc!, :bclose! | Close the current buffer forcefully, ignoring unsaved changes. |
:buffer-close-others, :bco, :bcloseother | Close all buffers but the currently focused one. |
:buffer-close-others!, :bco!, :bcloseother! | Force close all buffers but the currently focused one. |
:buffer-close-all, :bca, :bcloseall | Close all buffers without quitting. |
:buffer-close-all!, :bca!, :bcloseall! | Force close all buffers ignoring unsaved changes without quitting. |
:buffer-next, :bn, :bnext | Goto next buffer. |
:buffer-previous, :bp, :bprev | Goto previous buffer. |
:write, :w | Write changes to disk. Accepts an optional path (:write some/path.txt) |
:write!, :w! | Force write changes to disk creating necessary subdirectories. Accepts an optional path (:write! some/path.txt) |
:write-buffer-close, :wbc | Write changes to disk and closes the buffer. Accepts an optional path (:write-buffer-close some/path.txt) |
:write-buffer-close!, :wbc! | Force write changes to disk creating necessary subdirectories and closes the buffer. Accepts an optional path (:write-buffer-close! some/path.txt) |
:new, :n | Create a new scratch buffer. |
:format, :fmt | Format the file using an external formatter or language server. |
:indent-style | Set the indentation style for editing. (‘t’ for tabs or 1-16 for number of spaces.) |
:line-ending | Set the document’s default line ending. Options: crlf, lf. |
:earlier, :ear | Jump back to an earlier point in edit history. Accepts a number of steps or a time span. |
:later, :lat | Jump to a later point in edit history. Accepts a number of steps or a time span. |
:write-quit, :wq | Write changes to disk and close the current view. Accepts an optional path (:wq some/path.txt) |
:write-quit!, :wq! | Write changes to disk and close the current view forcefully. Accepts an optional path (:wq! some/path.txt) |
:write-all, :wa | Write changes from all buffers to disk. |
:write-all!, :wa! | Forcefully write changes from all buffers to disk creating necessary subdirectories. |
:write-quit-all, :wqa, :xa | Write changes from all buffers to disk and close all views. |
:write-quit-all!, :wqa!, :xa! | Forcefully write changes from all buffers to disk, creating necessary subdirectories, and close all views (ignoring unsaved changes). |
:quit-all, :qa | Close all views. |
:quit-all!, :qa! | Force close all views ignoring unsaved changes. |
:cquit, :cq | Quit with exit code (default 1). Accepts an optional integer exit code (:cq 2). |
:cquit!, :cq! | Force quit with exit code (default 1) ignoring unsaved changes. Accepts an optional integer exit code (:cq! 2). |
:theme | Change the editor theme (show current theme if no name specified). |
:yank-join | Yank joined selections. A separator can be provided as first argument. Default value is newline. |
:clipboard-yank | Yank main selection into system clipboard. |
:clipboard-yank-join | Yank joined selections into system clipboard. A separator can be provided as first argument. Default value is newline. |
:primary-clipboard-yank | Yank main selection into system primary clipboard. |
:primary-clipboard-yank-join | Yank joined selections into system primary clipboard. A separator can be provided as first argument. Default value is newline. |
:clipboard-paste-after | Paste system clipboard after selections. |
:clipboard-paste-before | Paste system clipboard before selections. |
:clipboard-paste-replace | Replace selections with content of system clipboard. |
:primary-clipboard-paste-after | Paste primary clipboard after selections. |
:primary-clipboard-paste-before | Paste primary clipboard before selections. |
:primary-clipboard-paste-replace | Replace selections with content of system primary clipboard. |
:show-clipboard-provider | Show clipboard provider name in status bar. |
:change-current-directory, :cd | Change the current working directory. |
:show-directory-stack | Show the directory stack as a |
:push-directory, :pushd | Save and then change the current directory. |
:pop-directory, :popd | Remove the top entry from the directory stack, and cd to the new top directory.. |
:show-directory, :pwd | Show the current working directory. |
:encoding | Set encoding. Based on https://encoding.spec.whatwg.org. |
:character-info, :char | Get info about the character under the primary cursor. |
:reload, :rl | Discard changes and reload from the source file. |
:reload-all, :rla | Discard changes and reload all documents from the source files. |
:update, :u | Write changes only if the file has been modified. |
:lsp-workspace-command | Open workspace command picker |
:lsp-restart | Restarts the given language servers, or all language servers that are used by the current file if no arguments are supplied |
:lsp-stop | Stops the given language servers, or all language servers that are used by the current file if no arguments are supplied |
:tree-sitter-scopes | Display tree sitter scopes, primarily for theming and development. |
:tree-sitter-highlight-name | Display name of tree-sitter highlight scope under the cursor. |
:tree-sitter-layers | Display language names of tree-sitter injection layers under the cursor. |
:debug-start, :dbg | Start a debug session from a given template with given parameters. |
:debug-remote, :dbg-tcp | Connect to a debug adapter by TCP address and start a debugging session from a given template with given parameters. |
:debug-eval | Evaluate expression in current debug context. |
:vsplit, :vs | Open the file in a vertical split. |
:vsplit-new, :vnew | Open a scratch buffer in a vertical split. |
:hsplit, :hs, :sp | Open the file in a horizontal split. |
:hsplit-new, :hnew | Open a scratch buffer in a horizontal split. |
:tutor | Open the tutorial. |
:goto, :g | Goto line number. |
:set-language, :lang | Set the language of current buffer (show current language if no value specified). |
:set-option, :set | Set a config option at runtime. For example to disable smart case search, use :set search.smart-case false. |
:toggle-option, :toggle | Toggle a config option at runtime. For example to toggle smart case search, use :toggle search.smart-case. |
:get-option, :get | Get the current value of a config option. |
:sort | Sort ranges in selection. |
:reflow | Hard-wrap the current selection of lines to a given width. |
:tree-sitter-subtree, :ts-subtree | Display the smallest tree-sitter subtree that spans the primary selection, primarily for debugging queries. |
:config-reload | Refresh user config. |
:config-open | Open the user config.toml file. |
:config-open-workspace | Open the workspace config.toml file. |
:log-open | Open the helix log file. |
:insert-output | Run shell command, inserting output before each selection. |
:append-output | Run shell command, appending output after each selection. |
:pipe, :| | Pipe each selection to the shell command. |
:pipe-to | Pipe each selection to the shell command, ignoring output. |
:run-shell-command, :sh, :! | Run a shell command |
:reset-diff-change, :diffget, :diffg | Reset the diff change at the cursor position. |
:clear-register | Clear given register. If no argument is provided, clear all registers. |
:set-register | Set contents of the given register. |
:redraw | Clear and re-render the whole UI |
:move, :mv | Move the current buffer and its corresponding file to a different path |
:move!, :mv! | Move the current buffer and its corresponding file to a different path creating necessary subdirectories |
:yank-diagnostic | Yank diagnostic(s) under primary cursor to register, or clipboard by default |
:read, :r | Load a file into buffer |
:echo | Prints the given arguments to the statusline. |
:noop | Does nothing. |
:workspace-trust | Allow language servers and local config for the current workspace. |
:workspace-untrust | Revoke the current workspace’s trust grant or exclusion. |
:workspace-exclude | Mark the current workspace as never-prompt. Never prompts for trust again. |
Static Commands
Static commands take no arguments and can be bound to keys. Static commands can also be executed from the command picker (<space>?). The built-in static commands are:
| Name | Description | Default keybinds |
|---|---|---|
no_op | Do nothing | |
move_char_left | Move left | normal: h, <left>, insert: <left> |
move_char_right | Move right | normal: l, <right>, insert: <right> |
move_line_up | Move up | normal: gk |
move_line_down | Move down | normal: gj |
move_visual_line_up | Move up | normal: k, <up>, insert: <up> |
move_visual_line_down | Move down | normal: j, <down>, insert: <down> |
extend_char_left | Extend left | select: h, <left> |
extend_char_right | Extend right | select: l, <right> |
extend_line_up | Extend up | select: gk |
extend_line_down | Extend down | select: gj |
extend_visual_line_up | Extend up | select: k, <up> |
extend_visual_line_down | Extend down | select: j, <down> |
copy_selection_on_next_line | Copy selection on next line | normal: C, select: C |
copy_selection_on_prev_line | Copy selection on previous line | normal: <A-C>, select: <A-C> |
move_next_word_start | Move to start of next word | normal: w |
move_prev_word_start | Move to start of previous word | normal: b |
move_next_word_end | Move to end of next word | normal: e |
move_prev_word_end | Move to end of previous word | |
move_next_long_word_start | Move to start of next long word | normal: W |
move_prev_long_word_start | Move to start of previous long word | normal: B |
move_next_long_word_end | Move to end of next long word | normal: E |
move_prev_long_word_end | Move to end of previous long word | |
move_next_sub_word_start | Move to start of next sub word | |
move_prev_sub_word_start | Move to start of previous sub word | |
move_next_sub_word_end | Move to end of next sub word | |
move_prev_sub_word_end | Move to end of previous sub word | |
move_parent_node_end | Move to end of the parent node | normal: <A-e> |
move_parent_node_start | Move to beginning of the parent node | normal: <A-b> |
extend_next_word_start | Extend to start of next word | select: w |
extend_prev_word_start | Extend to start of previous word | select: b |
extend_next_word_end | Extend to end of next word | select: e |
extend_prev_word_end | Extend to end of previous word | |
extend_next_long_word_start | Extend to start of next long word | select: W |
extend_prev_long_word_start | Extend to start of previous long word | select: B |
extend_next_long_word_end | Extend to end of next long word | select: E |
extend_prev_long_word_end | Extend to end of prev long word | |
extend_next_sub_word_start | Extend to start of next sub word | |
extend_prev_sub_word_start | Extend to start of previous sub word | |
extend_next_sub_word_end | Extend to end of next sub word | |
extend_prev_sub_word_end | Extend to end of prev sub word | |
extend_parent_node_end | Extend to end of the parent node | select: <A-e> |
extend_parent_node_start | Extend to beginning of the parent node | select: <A-b> |
find_till_char | Move till next occurrence of char | normal: t |
find_next_char | Move to next occurrence of char | normal: f |
extend_till_char | Extend till next occurrence of char | select: t |
extend_next_char | Extend to next occurrence of char | select: f |
till_prev_char | Move till previous occurrence of char | normal: T |
find_prev_char | Move to previous occurrence of char | normal: F |
extend_till_prev_char | Extend till previous occurrence of char | select: T |
extend_prev_char | Extend to previous occurrence of char | select: F |
repeat_last_motion | Repeat last motion | normal: <A-.>, select: <A-.> |
replace | Replace with new char | normal: r, select: r |
switch_case | Switch (toggle) case | normal: ~, select: ~ |
switch_to_uppercase | Switch to uppercase | normal: <A-`>, select: <A-`> |
switch_to_lowercase | Switch to lowercase | normal: `, select: ` |
page_up | Move page up | normal: <C-b>, Z<C-b>, z<C-b>, <pageup>, Z<pageup>, z<pageup>, select: <C-b>, Z<C-b>, z<C-b>, <pageup>, Z<pageup>, z<pageup>, insert: <pageup> |
page_down | Move page down | normal: <C-f>, Z<C-f>, z<C-f>, <pagedown>, Z<pagedown>, z<pagedown>, select: <C-f>, Z<C-f>, z<C-f>, <pagedown>, Z<pagedown>, z<pagedown>, insert: <pagedown> |
half_page_up | Move half page up | |
half_page_down | Move half page down | |
page_cursor_up | Move page and cursor up | |
page_cursor_down | Move page and cursor down | |
page_cursor_half_up | Move page and cursor half up | normal: <C-u>, Z<C-u>, z<C-u>, Z<backspace>, z<backspace>, select: <C-u>, Z<C-u>, z<C-u>, Z<backspace>, z<backspace> |
page_cursor_half_down | Move page and cursor half down | normal: <C-d>, Z<C-d>, z<C-d>, Z<space>, z<space>, select: <C-d>, Z<C-d>, z<C-d>, Z<space>, z<space> |
select_all | Select whole document | normal: %, select: % |
select_regex | Select all regex matches inside selections | normal: s, select: s |
split_selection | Split selections on regex matches | normal: S, select: S |
split_selection_on_newline | Split selection on newlines | normal: <A-s>, select: <A-s> |
merge_selections | Merge selections | normal: <A-minus>, select: <A-minus> |
merge_consecutive_selections | Merge consecutive selections | normal: <A-_>, select: <A-_> |
search | Search for regex pattern | normal: /, Z/, z/, select: /, Z/, z/ |
rsearch | Reverse search for regex pattern | normal: ?, Z?, z?, select: ?, Z?, z? |
search_next | Select next search match | normal: n, Zn, zn, select: Zn, zn |
search_prev | Select previous search match | normal: N, ZN, zN, select: ZN, zN |
extend_search_next | Add next search match to selection | select: n |
extend_search_prev | Add previous search match to selection | select: N |
search_selection | Use current selection as search pattern | normal: <A-*>, select: <A-*> |
search_selection_detect_word_boundaries | Use current selection as the search pattern, automatically wrapping with \b on word boundaries | normal: *, select: * |
make_search_word_bounded | Modify current search to make it word bounded | |
global_search | Global search in workspace folder | normal: <space>/, select: <space>/ |
extend_line | Select current line, if already selected, extend to another line based on the anchor | |
extend_line_below | Select current line, if already selected, extend to next line | normal: x, select: x |
extend_line_above | Select current line, if already selected, extend to previous line | |
select_line_above | Select current line, if already selected, extend or shrink line above based on the anchor | |
select_line_below | Select current line, if already selected, extend or shrink line below based on the anchor | |
extend_to_line_bounds | Extend selection to line bounds | normal: X, select: X |
shrink_to_line_bounds | Shrink selection to line bounds | normal: <A-x>, select: <A-x> |
delete_selection | Delete selection | normal: d, select: d |
delete_selection_noyank | Delete selection without yanking | normal: <A-d>, select: <A-d> |
change_selection | Change selection | normal: c, select: c |
change_selection_noyank | Change selection without yanking | normal: <A-c>, select: <A-c> |
collapse_selection | Collapse selection into single cursor | normal: ;, select: ; |
flip_selections | Flip selection cursor and anchor | normal: <A-;>, select: <A-;> |
ensure_selections_forward | Ensure all selections face forward | normal: <A-:>, select: <A-:> |
insert_mode | Insert before selection | normal: i, select: i |
append_mode | Append after selection | normal: a, select: a |
command_mode | Enter command mode | normal: :, select: : |
file_picker | Open file picker | normal: <space>f, select: <space>f |
file_picker_in_current_buffer_directory | Open file picker at current buffer’s directory | |
file_picker_in_current_directory | Open file picker at current working directory | normal: <space>F, select: <space>F |
file_explorer | Open file explorer in workspace root | normal: <space>e, select: <space>e |
file_explorer_in_current_buffer_directory | Open file explorer at current buffer’s directory | normal: <space>., select: <space>. |
file_explorer_in_current_directory | Open file explorer at current working directory | |
code_action | Perform code action | normal: <space>a, select: <space>a |
buffer_picker | Open buffer picker | normal: <space>b, select: <space>b |
jumplist_picker | Open jumplist picker | normal: <space>j, select: <space>j |
symbol_picker | Open symbol picker | |
syntax_symbol_picker | Open symbol picker from syntax information | |
lsp_or_syntax_symbol_picker | Open symbol picker from LSP or syntax information | normal: <space>s, select: <space>s |
changed_file_picker | Open changed file picker | normal: <space>g, select: <space>g |
select_references_to_symbol_under_cursor | Select symbol references | normal: <space>h, select: <space>h |
workspace_symbol_picker | Open workspace symbol picker | |
syntax_workspace_symbol_picker | Open workspace symbol picker from syntax information | |
lsp_or_syntax_workspace_symbol_picker | Open workspace symbol picker from LSP or syntax information | normal: <space>S, select: <space>S |
diagnostics_picker | Open diagnostic picker | normal: <space>d, select: <space>d |
workspace_diagnostics_picker | Open workspace diagnostic picker | normal: <space>D, select: <space>D |
last_picker | Open last picker | normal: <space>', select: <space>' |
insert_at_line_start | Insert at start of line | normal: I, select: I |
insert_at_line_end | Insert at end of line | normal: A, select: A |
open_below | Open new line below selection | normal: o, select: o |
open_above | Open new line above selection | normal: O, select: O |
normal_mode | Enter normal mode | normal: <esc>, select: v, insert: <esc> |
select_mode | Enter selection extend mode | normal: v |
exit_select_mode | Exit selection mode | select: <esc> |
goto_definition | Goto definition | normal: gd, select: gd |
goto_declaration | Goto declaration | normal: gD, select: gD |
add_newline_above | Add newline above | normal: [<space>, select: [<space> |
add_newline_below | Add newline below | normal: ]<space>, select: ]<space> |
goto_type_definition | Goto type definition | normal: gy, select: gy |
goto_implementation | Goto implementation | normal: gi, select: gi |
goto_file_start | Goto line number <n> else file start | normal: gg |
goto_file_end | Goto file end | |
extend_to_file_start | Extend to line number <n> else file start | select: gg |
extend_to_file_end | Extend to file end | |
goto_file | Goto files/URLs in selections | normal: gf, select: gf |
goto_file_hsplit | Goto files in selections (hsplit) | normal: <C-w>f, <space>wf, select: <C-w>f, <space>wf |
goto_file_vsplit | Goto files in selections (vsplit) | normal: <C-w>F, <space>wF, select: <C-w>F, <space>wF |
goto_reference | Goto references | normal: gr, select: gr |
goto_window_top | Goto window top | normal: gt, select: gt |
goto_window_center | Goto window center | normal: gc, select: gc |
goto_window_bottom | Goto window bottom | normal: gb, select: gb |
goto_last_accessed_file | Goto last accessed file | normal: ga, select: ga |
goto_last_modified_file | Goto last modified file | normal: gm, select: gm |
goto_last_modification | Goto last modification | normal: g., select: g. |
goto_line | Goto line | normal: G, select: G |
goto_last_line | Goto last line | normal: ge |
extend_to_last_line | Extend to last line | select: ge |
goto_first_diag | Goto first diagnostic | normal: [D, select: [D |
goto_last_diag | Goto last diagnostic | normal: ]D, select: ]D |
goto_next_diag | Goto next diagnostic | normal: ]d, select: ]d |
goto_prev_diag | Goto previous diagnostic | normal: [d, select: [d |
goto_next_change | Goto next change | normal: ]g, select: ]g |
goto_prev_change | Goto previous change | normal: [g, select: [g |
goto_first_change | Goto first change | normal: [G, select: [G |
goto_last_change | Goto last change | normal: ]G, select: ]G |
goto_line_start | Goto line start | normal: gh, <home>, select: gh, insert: <home> |
goto_line_end | Goto line end | normal: gl, <end>, select: gl |
goto_column | Goto column | normal: g| |
extend_to_column | Extend to column | select: g| |
goto_next_buffer | Goto next buffer | normal: gn, select: gn |
goto_previous_buffer | Goto previous buffer | normal: gp, select: gp |
goto_line_end_newline | Goto newline at line end | insert: <end> |
goto_first_nonwhitespace | Goto first non-blank in line | normal: gs, select: gs |
trim_selections | Trim whitespace from selections | normal: _, select: _ |
extend_to_line_start | Extend to line start | select: <home> |
extend_to_first_nonwhitespace | Extend to first non-blank in line | |
extend_to_line_end | Extend to line end | select: <end> |
extend_to_line_end_newline | Extend to line end | |
signature_help | Show signature help | |
smart_tab | Insert tab if all cursors have all whitespace to their left; otherwise, run a separate command. | insert: <tab> |
insert_tab | Insert tab char | insert: <S-tab> |
insert_newline | Insert newline char | insert: <C-j>, <ret> |
insert_char_interactive | Insert an interactively-chosen char | |
append_char_interactive | Append an interactively-chosen char | |
delete_char_backward | Delete previous char | insert: <C-h>, <backspace>, <S-backspace> |
delete_char_forward | Delete next char | insert: <C-d>, <del> |
delete_word_backward | Delete previous word | insert: <C-w>, <A-backspace> |
delete_word_forward | Delete next word | insert: <A-d>, <A-del> |
kill_to_line_start | Delete till start of line | insert: <C-u> |
kill_to_line_end | Delete till end of line | insert: <C-k> |
undo | Undo change | normal: u, select: u |
redo | Redo change | normal: U, select: U |
earlier | Move backward in history | normal: <A-u>, select: <A-u> |
later | Move forward in history | normal: <A-U>, select: <A-U> |
commit_undo_checkpoint | Commit changes to new checkpoint | insert: <C-s> |
yank | Yank selection | normal: y, select: y |
yank_to_clipboard | Yank selections to clipboard | normal: <space>y, select: <space>y |
yank_to_primary_clipboard | Yank selections to primary clipboard | |
yank_joined | Join and yank selections | |
yank_joined_to_clipboard | Join and yank selections to clipboard | |
yank_main_selection_to_clipboard | Yank main selection to clipboard | normal: <space>Y, select: <space>Y |
yank_joined_to_primary_clipboard | Join and yank selections to primary clipboard | |
yank_main_selection_to_primary_clipboard | Yank main selection to primary clipboard | |
replace_with_yanked | Replace with yanked text | normal: R, select: R |
replace_selections_with_clipboard | Replace selections by clipboard content | normal: <space>R, select: <space>R |
replace_selections_with_primary_clipboard | Replace selections by primary clipboard | |
paste_after | Paste after selection | normal: p, select: p |
paste_before | Paste before selection | normal: P, select: P |
paste_clipboard_after | Paste clipboard after selections | normal: <space>p, select: <space>p |
paste_clipboard_before | Paste clipboard before selections | normal: <space>P, select: <space>P |
paste_primary_clipboard_after | Paste primary clipboard after selections | |
paste_primary_clipboard_before | Paste primary clipboard before selections | |
indent | Indent selection | normal: <gt>, select: <gt> |
unindent | Unindent selection | normal: <lt>, select: <lt> |
format_selections | Format selection | normal: =, select: = |
join_selections | Join lines inside selection | normal: J, select: J |
join_selections_space | Join lines inside selection and select spaces | normal: <A-J>, select: <A-J> |
keep_selections | Keep selections matching regex | normal: K, select: K |
remove_selections | Remove selections matching regex | normal: <A-K>, select: <A-K> |
align_selections | Align selections in column | normal: &, select: & |
keep_primary_selection | Keep primary selection | normal: ,, select: , |
remove_primary_selection | Remove primary selection | normal: <A-,>, select: <A-,> |
completion | Invoke completion popup | insert: <C-x> |
hover | Show docs for item under cursor | normal: <space>k, select: <space>k |
toggle_comments | Comment/uncomment selections | normal: <C-c>, <space>c, select: <C-c>, <space>c |
toggle_line_comments | Line comment/uncomment selections | normal: <space><A-c>, select: <space><A-c> |
toggle_block_comments | Block comment/uncomment selections | normal: <space>C, select: <space>C |
rotate_selections_forward | Rotate selections forward | normal: ), select: ) |
rotate_selections_backward | Rotate selections backward | normal: (, select: ( |
rotate_selection_contents_forward | Rotate selection contents forward | normal: <A-)>, select: <A-)> |
rotate_selection_contents_backward | Rotate selections contents backward | normal: <A-(>, select: <A-(> |
reverse_selection_contents | Reverse selections contents | |
expand_selection | Expand selection to parent syntax node | normal: <A-o>, <A-up>, select: <A-o>, <A-up> |
shrink_selection | Shrink selection to previously expanded syntax node | normal: <A-i>, <A-down>, select: <A-i>, <A-down> |
select_next_sibling | Select next sibling in the syntax tree | normal: <A-n>, <A-right>, select: <A-n>, <A-right> |
select_prev_sibling | Select previous sibling the in syntax tree | normal: <A-p>, <A-left>, select: <A-p>, <A-left> |
select_all_siblings | Select all siblings of the current node | normal: <A-a>, select: <A-a> |
select_all_children | Select all children of the current node | normal: <A-I>, <S-A-down>, select: <A-I>, <S-A-down> |
jump_forward | Jump forward on jumplist | normal: <C-i>, <tab>, select: <C-i>, <tab> |
jump_backward | Jump backward on jumplist | normal: <C-o>, select: <C-o> |
save_selection | Save current selection to jumplist | normal: <C-s>, select: <C-s> |
jump_view_right | Jump to right split | normal: <C-w>l, <space>wl, <C-w><C-l>, <C-w><right>, <space>w<C-l>, <space>w<right>, select: <C-w>l, <space>wl, <C-w><C-l>, <C-w><right>, <space>w<C-l>, <space>w<right> |
jump_view_left | Jump to left split | normal: <C-w>h, <space>wh, <C-w><C-h>, <C-w><left>, <space>w<C-h>, <space>w<left>, select: <C-w>h, <space>wh, <C-w><C-h>, <C-w><left>, <space>w<C-h>, <space>w<left> |
jump_view_up | Jump to split above | normal: <C-w>k, <C-w><up>, <space>wk, <C-w><C-k>, <space>w<up>, <space>w<C-k>, select: <C-w>k, <C-w><up>, <space>wk, <C-w><C-k>, <space>w<up>, <space>w<C-k> |
jump_view_down | Jump to split below | normal: <C-w>j, <space>wj, <C-w><C-j>, <C-w><down>, <space>w<C-j>, <space>w<down>, select: <C-w>j, <space>wj, <C-w><C-j>, <C-w><down>, <space>w<C-j>, <space>w<down> |
swap_view_right | Swap with right split | normal: <C-w>L, <space>wL, select: <C-w>L, <space>wL |
swap_view_left | Swap with left split | normal: <C-w>H, <space>wH, select: <C-w>H, <space>wH |
swap_view_up | Swap with split above | normal: <C-w>K, <space>wK, select: <C-w>K, <space>wK |
swap_view_down | Swap with split below | normal: <C-w>J, <space>wJ, select: <C-w>J, <space>wJ |
transpose_view | Transpose splits | normal: <C-w>t, <space>wt, <C-w><C-t>, <space>w<C-t>, select: <C-w>t, <space>wt, <C-w><C-t>, <space>w<C-t> |
rotate_view | Goto next window | normal: <C-w>w, <space>ww, <C-w><C-w>, <space>w<C-w>, select: <C-w>w, <space>ww, <C-w><C-w>, <space>w<C-w> |
rotate_view_reverse | Goto previous window | |
hsplit | Horizontal bottom split | normal: <C-w>s, <space>ws, <C-w><C-s>, <space>w<C-s>, select: <C-w>s, <space>ws, <C-w><C-s>, <space>w<C-s> |
hsplit_new | Horizontal bottom split scratch buffer | normal: <C-w>ns, <space>wns, <C-w>n<C-s>, <space>wn<C-s>, select: <C-w>ns, <space>wns, <C-w>n<C-s>, <space>wn<C-s> |
vsplit | Vertical right split | normal: <C-w>v, <space>wv, <C-w><C-v>, <space>w<C-v>, select: <C-w>v, <space>wv, <C-w><C-v>, <space>w<C-v> |
vsplit_new | Vertical right split scratch buffer | normal: <C-w>nv, <space>wnv, <C-w>n<C-v>, <space>wn<C-v>, select: <C-w>nv, <space>wnv, <C-w>n<C-v>, <space>wn<C-v> |
wclose | Close window | normal: <C-w>q, <space>wq, <C-w><C-q>, <space>w<C-q>, select: <C-w>q, <space>wq, <C-w><C-q>, <space>w<C-q> |
wonly | Close windows except current | normal: <C-w>o, <space>wo, <C-w><C-o>, <space>w<C-o>, select: <C-w>o, <space>wo, <C-w><C-o>, <space>w<C-o> |
select_register | Select register | normal: ", select: " |
insert_register | Insert register | insert: <C-r> |
copy_between_registers | Copy between two registers | |
align_view_middle | Align view middle | normal: Zm, zm, select: Zm, zm |
align_view_top | Align view top | normal: Zt, zt, select: Zt, zt |
align_view_center | Align view center | normal: Zc, Zz, zc, zz, select: Zc, Zz, zc, zz |
align_view_bottom | Align view bottom | normal: Zb, zb, select: Zb, zb |
scroll_up | Scroll view up | normal: Zk, zk, Z<up>, z<up>, select: Zk, zk, Z<up>, z<up> |
scroll_down | Scroll view down | normal: Zj, zj, Z<down>, z<down>, select: Zj, zj, Z<down>, z<down> |
match_brackets | Goto matching bracket | normal: mm, select: mm |
surround_add | Surround add | normal: ms, select: ms |
surround_replace | Surround replace | normal: mr, select: mr |
surround_delete | Surround delete | normal: md, select: md |
select_textobject_around | Select around object | normal: ma, select: ma |
select_textobject_inner | Select inside object | normal: mi, select: mi |
goto_next_function | Goto next function | normal: ]f, select: ]f |
goto_prev_function | Goto previous function | normal: [f, select: [f |
goto_next_class | Goto next type definition | normal: ]t, select: ]t |
goto_prev_class | Goto previous type definition | normal: [t, select: [t |
goto_next_parameter | Goto next parameter | normal: ]a, select: ]a |
goto_prev_parameter | Goto previous parameter | normal: [a, select: [a |
goto_next_comment | Goto next comment | normal: ]c, select: ]c |
goto_prev_comment | Goto previous comment | normal: [c, select: [c |
goto_next_test | Goto next test | normal: ]T, select: ]T |
goto_prev_test | Goto previous test | normal: [T, select: [T |
goto_next_xml_element | Goto next (X)HTML element | normal: ]x, select: ]x |
goto_prev_xml_element | Goto previous (X)HTML element | normal: [x, select: [x |
goto_next_entry | Goto next pairing | normal: ]e, select: ]e |
goto_prev_entry | Goto previous pairing | normal: [e, select: [e |
goto_next_paragraph | Goto next paragraph | normal: ]p, select: ]p |
goto_prev_paragraph | Goto previous paragraph | normal: [p, select: [p |
dap_launch | Launch debug target | normal: <space>Gl, select: <space>Gl |
dap_restart | Restart debugging session | normal: <space>Gr, select: <space>Gr |
dap_toggle_breakpoint | Toggle breakpoint | normal: <space>Gb, select: <space>Gb |
dap_continue | Continue program execution | normal: <space>Gc, select: <space>Gc |
dap_pause | Pause program execution | normal: <space>Gh, select: <space>Gh |
dap_step_in | Step in | normal: <space>Gi, select: <space>Gi |
dap_step_out | Step out | normal: <space>Go, select: <space>Go |
dap_next | Step to next | normal: <space>Gn, select: <space>Gn |
dap_variables | List variables | normal: <space>Gv, select: <space>Gv |
dap_terminate | End debug session | normal: <space>Gt, select: <space>Gt |
dap_edit_condition | Edit breakpoint condition on current line | normal: <space>G<C-c>, select: <space>G<C-c> |
dap_edit_log | Edit breakpoint log message on current line | normal: <space>G<C-l>, select: <space>G<C-l> |
dap_switch_thread | Switch current thread | normal: <space>Gst, select: <space>Gst |
dap_switch_stack_frame | Switch stack frame | normal: <space>Gsf, select: <space>Gsf |
dap_enable_exceptions | Enable exception breakpoints | normal: <space>Ge, select: <space>Ge |
dap_disable_exceptions | Disable exception breakpoints | normal: <space>GE, select: <space>GE |
shell_pipe | Pipe selections through shell command | normal: |, select: | |
shell_pipe_to | Pipe selections into shell command ignoring output | normal: <A-|>, select: <A-|> |
shell_insert_output | Insert shell command output before selections | normal: !, select: ! |
shell_append_output | Append shell command output after selections | normal: <A-!>, select: <A-!> |
shell_keep_pipe | Filter selections with shell predicate | normal: $, select: $ |
suspend | Suspend and return to shell | normal: <C-z>, select: <C-z> |
rename_symbol | Rename symbol | normal: <space>r, select: <space>r |
increment | Increment item under cursor | normal: <C-a>, select: <C-a> |
decrement | Decrement item under cursor | normal: <C-x>, select: <C-x> |
record_macro | Record macro | normal: Q, select: Q |
replay_macro | Replay macro | normal: q, select: q |
command_palette | Open command palette | normal: <space>?, select: <space>? |
goto_word | Jump to a two-character label | normal: gw |
extend_to_word | Extend to a two-character label | select: gw |
goto_next_tabstop | Goto next snippet placeholder | |
goto_prev_tabstop | Goto next snippet placeholder | |
rotate_selections_first | Make the first selection your primary one | |
rotate_selections_last | Make the last selection your primary one |
Language servers
Helix has built-in support for the Language Server Protocol, providing IDE-like features — diagnostics, completion, goto-definition, rename and more, for any language that has a server configured. Language servers are separate programs you install yourself: the language support page lists which languages ship with a server configured, and the language server configuration wiki has per-server installation notes.
Run hx --health <language> to check whether Helix found the configured server
for a language. After changing a server’s configuration, :lsp-restart reloads
it and :lsp-stop stops it; :lsp-workspace-command runs a command the server
exposes for the workspace.
Features
Most features are bound by default (see the keymap); the relevant keys are listed below.
| Feature | Default key / command |
|---|---|
| Diagnostics — shown inline and in the gutter | navigate with [d / ]d; Space-d / Space-D open the document / workspace pickers |
| Completion | automatic while typing; Ctrl-x triggers it manually |
| Hover documentation | Space-k |
| Signature help (parameter hints) | automatic while typing arguments |
| Goto definition / declaration / type / references / implementation | gd / gD / gy / gr / gi |
| Rename symbol | Space-r |
| Code actions | Space-a |
| Document / workspace symbols | Space-s / Space-S |
| Format document | :format, or set auto-format to format on save |
| Inlay hints | enable with display-inlay-hints (see below) |
Configuration
The [editor.lsp] section of config.toml
toggles LSP behaviour — display-inlay-hints, auto-signature-help,
auto-document-highlight, snippets, and enable to disable LSP entirely. How
much diagnostic detail is shown inline at the cursor is configured separately in
[editor.inline-diagnostics].
Which server(s) a language uses, the server’s command and arguments, and any
language-specific settings are configured in languages.toml (see
Language Server configuration). A
language may use several servers:
for each request the first server in the list that supports it is used, and a
server’s features can be limited with only-features / except-features.
Language support
Language Support
The following languages and Language Servers are supported. To use Language Server features, you must first configure the appropriate Language Server.
You can check the language support in your installed helix version with hx --health.
Also see the Language Configuration docs and the Adding Languages guide for more language configuration information.
| Language | Syntax Highlighting | Treesitter Textobjects | Auto Indent | Code Navigation Tags | Rainbow Brackets | Default language servers |
|---|---|---|---|---|---|---|
| ada | ✓ | ✓ | ada_language_server | |||
| adl | ✓ | ✓ | ✓ | |||
| agda | ✓ | |||||
| alloy | ✓ | |||||
| amber | ✓ | ✓ | ✓ | ✓ | ✓ | amber-lsp |
| astro | ✓ | astro-ls | ||||
| awk | ✓ | ✓ | awk-language-server | |||
| bash | ✓ | ✓ | ✓ | ✓ | ✓ | bash-language-server |
| basic | ✓ | ✓ | ✓ | ✓ | ||
| bass | ✓ | bass | ||||
| batch | ✓ | ✓ | ✓ | ✓ | ✓ | |
| beancount | ✓ | beancount-language-server | ||||
| bibtex | ✓ | texlab | ||||
| bicep | ✓ | bicep-langserver | ||||
| bitbake | ✓ | bitbake-language-server | ||||
| blade | ✓ | ✓ | ✓ | |||
| blueprint | ✓ | blueprint-compiler | ||||
| bovex | ||||||
| c | ✓ | ✓ | ✓ | ✓ | ✓ | clangd |
| c-sharp | ✓ | ✓ | ✓ | ✓ | ✓ | roslyn-language-server, OmniSharp, csharp-ls |
| c3 | ✓ | c3-lsp | ||||
| cabal | haskell-language-server-wrapper | |||||
| caddyfile | ✓ | ✓ | ✓ | |||
| cairo | ✓ | ✓ | ✓ | cairo-language-server | ||
| capnp | ✓ | ✓ | ||||
| cel | ✓ | |||||
| chuck | ✓ | |||||
| circom | ✓ | circom-lsp | ||||
| clarity | ✓ | ✓ | ✓ | ✓ | ✓ | clarinet |
| clojure | ✓ | ✓ | ✓ | ✓ | ✓ | clojure-lsp |
| cmake | ✓ | ✓ | ✓ | ✓ | neocmakelsp, cmake-language-server | |
| codeql | ✓ | ✓ | codeql | |||
| comment | ✓ | |||||
| common-lisp | ✓ | ✓ | ✓ | ✓ | cl-lsp | |
| concerto | ✓ | ✓ | ✓ | |||
| cpon | ✓ | ✓ | ||||
| cpp | ✓ | ✓ | ✓ | ✓ | ✓ | clangd |
| cross-config | ✓ | ✓ | ✓ | taplo, tombi | ||
| crystal | ✓ | ✓ | ✓ | ✓ | ✓ | crystalline, ameba-ls |
| css | ✓ | ✓ | ✓ | ✓ | vscode-css-language-server | |
| csv | ✓ | |||||
| cue | ✓ | cue | ||||
| cylc | ✓ | ✓ | ✓ | |||
| cython | ✓ | ✓ | ✓ | |||
| d | ✓ | ✓ | ✓ | serve-d | ||
| dart | ✓ | ✓ | ✓ | ✓ | ✓ | dart |
| dbml | ✓ | |||||
| debian | ✓ | debian-lsp | ||||
| devicetree | ✓ | dts-lsp | ||||
| dhall | ✓ | ✓ | dhall-lsp-server | |||
| diff | ✓ | |||||
| djot | ✓ | |||||
| docker-bake | ✓ | ✓ | ✓ | ✓ | ✓ | docker-language-server |
| docker-compose | ✓ | ✓ | ✓ | docker-compose-langserver, yaml-language-server, docker-language-server | ||
| dockerfile | ✓ | ✓ | docker-langserver, docker-language-server | |||
| dot | ✓ | dot-language-server | ||||
| doxyfile | ✓ | ✓ | ✓ | ✓ | ||
| drools | drools-lsp | |||||
| dtd | ✓ | |||||
| dune | ✓ | |||||
| dunstrc | ✓ | |||||
| earthfile | ✓ | ✓ | ✓ | earthlyls | ||
| ebnf | ✓ | ebnfer | ||||
| edoc | ✓ | |||||
| eex | ✓ | |||||
| eiffel | ✓ | ✓ | ✓ | eiffel-language-server | ||
| ejs | ✓ | |||||
| elisp | ✓ | ✓ | ||||
| elixir | ✓ | ✓ | ✓ | ✓ | ✓ | elixir-ls, expert |
| elm | ✓ | ✓ | ✓ | ✓ | elm-language-server | |
| elvish | ✓ | elvish | ||||
| embedded-perl | ✓ | |||||
| env | ✓ | ✓ | ||||
| erb | ✓ | |||||
| erlang | ✓ | ✓ | ✓ | ✓ | ✓ | erlang_ls, elp |
| esdl | ✓ | |||||
| fennel | ✓ | ✓ | fennel-ls | |||
| fga | ✓ | ✓ | ✓ | |||
| fidl | ✓ | |||||
| fish | ✓ | ✓ | ✓ | fish-lsp | ||
| flatbuffers | ✓ | |||||
| forth | ✓ | forth-lsp | ||||
| fortran | ✓ | ✓ | fortls | |||
| freebasic | ✓ | ✓ | ✓ | ✓ | ||
| fsharp | ✓ | ✓ | fsautocomplete | |||
| gas | ✓ | ✓ | asm-lsp | |||
| gdscript | ✓ | ✓ | ✓ | ✓ | ✓ | ncat |
| gemini | ✓ | |||||
| gherkin | ✓ | |||||
| ghostty | ✓ | ghostty-ls | ||||
| git-attributes | ✓ | |||||
| git-cliff-config | ✓ | ✓ | ✓ | taplo, tombi | ||
| git-commit | ✓ | ✓ | commit-lsp | |||
| git-config | ✓ | ✓ | ✓ | |||
| git-ignore | ✓ | |||||
| git-notes | ✓ | |||||
| git-rebase | ✓ | |||||
| github-action | ✓ | ✓ | ✓ | ✓ | actions-languageserver, yaml-language-server, zizmor | |
| gitlab-ci | ✓ | ✓ | ✓ | ✓ | ✓ | yaml-language-server, gitlab-ci-ls |
| gjs | ✓ | ✓ | ✓ | ✓ | typescript-language-server, vscode-eslint-language-server, ember-language-server | |
| gleam | ✓ | ✓ | ✓ | gleam | ||
| glimmer | ✓ | ember-language-server | ||||
| glsl | ✓ | ✓ | ✓ | ✓ | ✓ | glsl_analyzer, glsld |
| gn | ✓ | |||||
| gnuplot | ✓ | |||||
| go | ✓ | ✓ | ✓ | ✓ | ✓ | gopls, golangci-lint-langserver |
| go-format-string | ✓ | ✓ | ||||
| godot-resource | ✓ | ✓ | ✓ | |||
| gomod | ✓ | gopls | ||||
| gotmpl | ✓ | gopls | ||||
| gowork | ✓ | gopls | ||||
| gpr | ✓ | ada_language_server | ||||
| graphql | ✓ | ✓ | ✓ | graphql-lsp | ||
| gren | ✓ | ✓ | ||||
| groovy | ✓ | ✓ | ||||
| gts | ✓ | ✓ | ✓ | ✓ | typescript-language-server, vscode-eslint-language-server, ember-language-server | |
| hare | ✓ | ✓ | hare-lsp | |||
| haskell | ✓ | ✓ | ✓ | ✓ | haskell-language-server-wrapper | |
| haskell-literate | ✓ | haskell-language-server-wrapper | ||||
| haskell-persistent | ✓ | |||||
| haxe | ✓ | ✓ | ||||
| hcl | ✓ | ✓ | ✓ | ✓ | terraform-ls | |
| hdl | ✓ | hdls | ||||
| heex | ✓ | ✓ | elixir-ls, expert | |||
| helm | ✓ | helm_ls | ||||
| hocon | ✓ | ✓ | ✓ | |||
| hoon | ✓ | |||||
| hosts | ✓ | |||||
| html | ✓ | ✓ | ✓ | ✓ | vscode-html-language-server, superhtml | |
| htmldjango | ✓ | djlsp, vscode-html-language-server, superhtml | ||||
| hurl | ✓ | ✓ | ✓ | |||
| hy | ✓ | hyuga | ||||
| hyprlang | ✓ | ✓ | ✓ | hyprls | ||
| idris | idris2-lsp | |||||
| iex | ✓ | |||||
| ini | ✓ | ✓ | ||||
| ink | ✓ | ✓ | ✓ | |||
| inko | ✓ | ✓ | ✓ | ✓ | ||
| janet | ✓ | ✓ | ✓ | |||
| java | ✓ | ✓ | ✓ | ✓ | ✓ | jdtls |
| javascript | ✓ | ✓ | ✓ | ✓ | ✓ | typescript-language-server |
| jinja | ✓ | |||||
| jjconfig | ✓ | ✓ | ✓ | taplo, tombi | ||
| jjdescription | ✓ | |||||
| jjrevset | ✓ | |||||
| jjtemplate | ✓ | |||||
| jq | ✓ | ✓ | jq-lsp | |||
| jsdoc | ✓ | |||||
| json | ✓ | ✓ | ✓ | ✓ | vscode-json-language-server | |
| json-ld | ✓ | ✓ | ✓ | ✓ | vscode-json-language-server | |
| json5 | ✓ | ✓ | ✓ | ✓ | ||
| jsonc | ✓ | ✓ | ✓ | ✓ | vscode-json-language-server | |
| jsonnet | ✓ | jsonnet-language-server | ||||
| jsx | ✓ | ✓ | ✓ | ✓ | ✓ | typescript-language-server |
| julia | ✓ | ✓ | ✓ | ✓ | ✓ | julia |
| just | ✓ | ✓ | ✓ | ✓ | just-lsp | |
| kcl | ✓ | kcl-language-server | ||||
| kconfig | ✓ | ✓ | ||||
| kdl | ✓ | ✓ | ✓ | ✓ | ✓ | |
| klog | ✓ | |||||
| koka | ✓ | ✓ | koka | |||
| kotlin | ✓ | ✓ | ✓ | ✓ | ✓ | kotlin-language-server |
| koto | ✓ | ✓ | ✓ | ✓ | koto-ls | |
| latex | ✓ | ✓ | ✓ | texlab | ||
| ld | ✓ | ✓ | ||||
| ldif | ✓ | |||||
| lean | ✓ | lake | ||||
| ledger | ✓ | |||||
| less | ✓ | ✓ | ✓ | vscode-css-language-server | ||
| llvm | ✓ | ✓ | ✓ | |||
| llvm-mir | ✓ | ✓ | ✓ | |||
| llvm-mir-yaml | ✓ | ✓ | ||||
| log | ✓ | |||||
| lpf | ✓ | |||||
| lua | ✓ | ✓ | ✓ | ✓ | ✓ | lua-language-server |
| lua-format-string | ✓ | |||||
| luap | ✓ | |||||
| luau | ✓ | ✓ | ✓ | luau-lsp | ||
| ✓ | ✓ | ✓ | ||||
| make | ✓ | ✓ | ||||
| markdoc | ✓ | markdoc-ls | ||||
| markdown | ✓ | ✓ | marksman, markdown-oxide, rumdl | |||
| markdown-rustdoc | ✓ | |||||
| markdown.inline | ✓ | |||||
| matlab | ✓ | ✓ | ✓ | |||
| mermaid | ✓ | |||||
| meson | ✓ | ✓ | mesonlsp | |||
| metamath | ✓ | ✓ | mm-lsp-server | |||
| mint | mint | |||||
| miseconfig | ✓ | ✓ | ✓ | taplo, tombi | ||
| mojo | ✓ | ✓ | ✓ | pixi | ||
| moonbit | ✓ | ✓ | ✓ | ✓ | moonbit-lsp | |
| move | ✓ | ✓ | ||||
| msbuild | ✓ | ✓ | ||||
| nasm | ✓ | ✓ | asm-lsp | |||
| nearley | ✓ | ✓ | ||||
| nestedtext | ✓ | ✓ | ✓ | |||
| nginx | ✓ | nginx-language-server | ||||
| nickel | ✓ | ✓ | nls | |||
| nim | ✓ | ✓ | ✓ | ✓ | nimlangserver | |
| nix | ✓ | ✓ | ✓ | ✓ | ✓ | nil, nixd |
| nu | ✓ | ✓ | ✓ | nu, nu-lint | ||
| nunjucks | ✓ | |||||
| ocaml | ✓ | ✓ | ✓ | ✓ | ocamllsp | |
| ocaml-interface | ✓ | ocamllsp | ||||
| odin | ✓ | ✓ | ✓ | ols | ||
| ohm | ✓ | ✓ | ✓ | |||
| opencl | ✓ | ✓ | ✓ | clangd | ||
| openscad | ✓ | openscad-lsp | ||||
| org | ✓ | |||||
| p | ✓ | |||||
| pascal | ✓ | ✓ | pasls | |||
| passwd | ✓ | |||||
| pem | ✓ | |||||
| penrose | ✓ | ✓ | ||||
| perl | ✓ | ✓ | ✓ | ✓ | ✓ | perlnavigator |
| pest | ✓ | ✓ | ✓ | pest-language-server | ||
| php | ✓ | ✓ | ✓ | ✓ | ✓ | intelephense |
| php-only | ✓ | ✓ | ||||
| picat | ✓ | ✓ | ✓ | ✓ | ✓ | |
| pip-requirements | ✓ | |||||
| pkgbuild | ✓ | ✓ | ✓ | termux-language-server, bash-language-server | ||
| pkl | ✓ | ✓ | pkl-lsp | |||
| po | ✓ | ✓ | ||||
| pod | ✓ | |||||
| ponylang | ✓ | ✓ | ✓ | pony-lsp | ||
| powershell | ✓ | ✓ | ||||
| prisma | ✓ | ✓ | prisma-language-server | |||
| prolog | ✓ | ✓ | swipl | |||
| properties | ✓ | ✓ | ||||
| protobuf | ✓ | ✓ | ✓ | ✓ | buf, pb, protols | |
| proverif | ✓ | |||||
| prql | ✓ | |||||
| ptx | ✓ | ✓ | ||||
| pug | ✓ | |||||
| puppet | ✓ | ✓ | puppet-languageserver | |||
| purescript | ✓ | ✓ | purescript-language-server | |||
| python | ✓ | ✓ | ✓ | ✓ | ✓ | ty, ruff, jedi-language-server, pylsp, zuban |
| qml | ✓ | ✓ | ✓ | qmlls | ||
| qmv | ||||||
| quarto | ✓ | ✓ | ||||
| quint | ✓ | quint-language-server | ||||
| r | ✓ | ✓ | ✓ | ✓ | ✓ | R |
| racket | ✓ | ✓ | ✓ | racket | ||
| regex | ✓ | ✓ | ||||
| rego | ✓ | regols | ||||
| rescript | ✓ | ✓ | rescript-language-server | |||
| ripple | ✓ | ✓ | ✓ | ripple-language-server | ||
| rmarkdown | ✓ | ✓ | R | |||
| robot | ✓ | ✓ | robotcode, robotframework_ls | |||
| robots.txt | ✓ | ✓ | ✓ | |||
| ron | ✓ | ✓ | ✓ | ✓ | ron-lsp | |
| rpmspec | ✓ | |||||
| rshtml | ✓ | ✓ | rshtml-analyzer, vscode-html-language-server, superhtml | |||
| rst | ✓ | ✓ | ||||
| ruby | ✓ | ✓ | ✓ | ✓ | ✓ | ruby-lsp, solargraph |
| rust | ✓ | ✓ | ✓ | ✓ | ✓ | rust-analyzer |
| rust-format-args | ✓ | |||||
| rust-format-args-macro | ✓ | ✓ | ✓ | ✓ | ||
| sage | ✓ | ✓ | ||||
| scala | ✓ | ✓ | ✓ | ✓ | ✓ | metals |
| scfg | ✓ | |||||
| scheme | ✓ | ✓ | ✓ | ✓ | ✓ | |
| scss | ✓ | ✓ | ✓ | vscode-css-language-server | ||
| sgf | ✓ | ✓ | ✓ | |||
| shellcheckrc | ✓ | ✓ | ||||
| slang | ✓ | ✓ | ✓ | slangd | ||
| slint | ✓ | ✓ | ✓ | slint-lsp | ||
| slisp | ✓ | ✓ | ||||
| smali | ✓ | ✓ | smalisp | |||
| smithy | ✓ | cs | ||||
| sml | ✓ | millet-ls | ||||
| snakemake | ✓ | ✓ | pylsp | |||
| solidity | ✓ | ✓ | ✓ | solc | ||
| sourcepawn | ✓ | ✓ | sourcepawn-studio | |||
| spade | ✓ | ✓ | ✓ | swim | ||
| spicedb | ✓ | ✓ | ||||
| sql | ✓ | ✓ | ✓ | |||
| ssh_client_config | ✓ | |||||
| starlark | ✓ | ✓ | ✓ | ✓ | starpls, buck2 | |
| strace | ✓ | |||||
| strictdoc | ✓ | ✓ | ||||
| styx | ✓ | ✓ | ✓ | ✓ | styx | |
| supercollider | ✓ | |||||
| svelte | ✓ | ✓ | ✓ | ✓ | ✓ | svelteserver |
| sway | ✓ | ✓ | ✓ | forc | ||
| swift | ✓ | ✓ | ✓ | ✓ | ✓ | sourcekit-lsp |
| systemd | ✓ | ✓ | systemd-lsp | |||
| systemverilog | ✓ | svlangserver, verible-verilog-ls | ||||
| t32 | ✓ | |||||
| tablegen | ✓ | ✓ | ✓ | |||
| tact | ✓ | ✓ | ✓ | |||
| task | ✓ | |||||
| tcl | ✓ | ✓ | ||||
| teal | ✓ | teal-language-server | ||||
| templ | ✓ | ✓ | ✓ | ✓ | templ | |
| tera | ✓ | |||||
| textproto | ✓ | ✓ | ✓ | |||
| tfvars | ✓ | ✓ | terraform-ls | |||
| thrift | ✓ | |||||
| tilt | ✓ | ✓ | ✓ | ✓ | tilt | |
| tlaplus | ✓ | |||||
| todotxt | ✓ | |||||
| tolk | ✓ | ✓ | ||||
| toml | ✓ | ✓ | ✓ | ✓ | ✓ | taplo, tombi |
| tql | ✓ | ✓ | ||||
| tsq | ✓ | ✓ | ts_query_ls | |||
| tsx | ✓ | ✓ | ✓ | ✓ | ✓ | typescript-language-server |
| twig | ✓ | |||||
| typescript | ✓ | ✓ | ✓ | ✓ | ✓ | typescript-language-server |
| typespec | ✓ | ✓ | ✓ | tsp-server | ||
| typst | ✓ | ✓ | ✓ | tinymist | ||
| ungrammar | ✓ | |||||
| unison | ✓ | ✓ | ✓ | ✓ | ✓ | |
| uxntal | ✓ | |||||
| v | ✓ | ✓ | ✓ | v-analyzer | ||
| vala | ✓ | ✓ | vala-language-server | |||
| varlink | ✓ | varlink-language-server | ||||
| vento | ✓ | |||||
| verilog | ✓ | ✓ | verible-verilog-ls | |||
| vhdl | ✓ | vhdl_ls | ||||
| vhs | ✓ | |||||
| vim | ✓ | ✓ | ||||
| vue | ✓ | ✓ | ✓ | vue-language-server | ||
| wast | ✓ | |||||
| wat | ✓ | wat_server | ||||
| webc | ✓ | |||||
| werk | ✓ | |||||
| wesl | ✓ | ✓ | ||||
| wgsl | ✓ | ✓ | ✓ | ✓ | ✓ | wgsl-analyzer |
| wikitext | ✓ | wikitext-lsp | ||||
| wit | ✓ | ✓ | ||||
| woodpecker-ci | ✓ | ✓ | ✓ | ✓ | ✓ | yaml-language-server |
| wren | ✓ | ✓ | ✓ | |||
| xit | ✓ | |||||
| xml | ✓ | ✓ | ✓ | ✓ | ||
| xtc | ✓ | |||||
| xwiki | ✓ | |||||
| yaml | ✓ | ✓ | ✓ | ✓ | yaml-language-server, ansible-language-server | |
| yara | ✓ | yls | ||||
| yuck | ✓ | ✓ | ✓ | |||
| zig | ✓ | ✓ | ✓ | ✓ | ✓ | zls |
Workspace trust
Helix has several features that can execute arbitrary code:
- Language servers (LSP)
- Debug adapters (DAP)
- Local workspace configuration (
.helix/config.toml,.helix/languages.toml) - Git integration (filters and other commands in a repository’s
.git/config)
To protect against malicious projects (a checked-out PR, a freshly cloned
repository, etc.) Helix gates these behind explicit per-workspace trust.
By default language servers start automatically (their binaries come from
$PATH, not from the workspace) and debug adapters may be launched, but
loading .helix/config.toml or .helix/languages.toml and trusting a
repository’s .git/config requires opting in. Note that debug adapters
are never started automatically — you launch them yourself — but the same
trust level still gates whether they may run. The model is intentionally
similar to direnv: you run :workspace-trust once
per workspace and Helix remembers across sessions.
Granting trust
When Helix opens a file inside a workspace it has never seen before, a modal trust prompt asks:
- Trust — allow the workspace permanently.
- Never — exclude the workspace; never prompt again.
<Esc> (or any other dismissal) caches “untrusted for this session” so
the prompt doesn’t re-fire for every file you open in the workspace. The
next time you start Helix in that workspace, it’ll prompt again.
A small [⚠] indicator appears in the bottom-right of the editor (next
to the macro-recording [@]) whenever the workspace is in restricted mode
and running :workspace-trust would change observable behavior — i.e.
when there’s a local config to load or an LSP that would start.
You can also run :workspace-trust / :workspace-untrust /
:workspace-exclude directly from the typed command prompt.
Revoking trust
Run :workspace-untrust to revoke a workspace’s trust grant. The next time
you open a file in that workspace, you’re back to the untrusted hint.
Detecting changes after trust was granted
When you trust a workspace, Helix records a hash of every file under
.helix/. If those files change afterwards (a malicious checkout, an
inadvertent rebase, etc.) Helix detects the mismatch on the next open and
reports the workspace as stale:
Workspace `.helix/` config changed since `:workspace-trust`. Local config
not loaded. Run `:workspace-trust` to re-allow.
In the stale state, language servers continue to run (they use the
globally-configured binaries on $PATH, which are unchanged), but
.helix/config.toml and .helix/languages.toml are not loaded. Run
:workspace-trust again to re-pin the new hash.
Storage
Trust grants live in data_dir()/workspace_trust/, one small file per
workspace. The filename is the SHA-256 of the workspace’s absolute path;
the contents look like:
path = /home/user/proj1
hash = sha256:abc123...
excluded = false
- Linux, macOS:
~/.local/share/helix/workspace_trust/ - Windows:
%AppData%\Roaming\helix\workspace_trust\
The one-file-per-workspace shape is safe under multiple concurrent Helix instances — different workspaces never write the same file.
Configuration
Settings live under [editor.workspace-trust]:
| Key | Values | Default | Effect |
|---|---|---|---|
level | "none", "servers", "insecure" | "servers" | What is auto-trusted in every workspace. See below. |
prompt | true, false | true | Whether to surface the modal popup. The [⚠] indicator is shown regardless. |
trusted | list of glob patterns | [] | Workspaces matching a pattern are trusted without a grant. Discouraged; see below. |
Recommended setups
Default: trust servers, prompt before loading workspace config.
[editor.workspace-trust]
level = "servers"
prompt = true
Language servers start automatically in every workspace — their binaries
come from $PATH and are not workspace-controlled — and debug adapters
you launch are allowed to run. The modal only appears when opening a file
in a workspace whose .helix/config.toml or .helix/languages.toml would
unlock something. Trust everything else with one keystroke per workspace,
deny with another.
Maximum security: never prompt, trust each workspace by hand.
[editor.workspace-trust]
level = "none"
prompt = false
Nothing trusts implicitly: language servers, debug adapters, local
config, and git Trust::Full are all off until you run
:workspace-trust. The popup never appears; the [⚠] indicator in the
bottom-right is your only signal that the current workspace is
restricted. Suited to users who would rather grant trust as a
deliberate action than dismiss a dialog.
Warning
level = "insecure"is highly discouraged. It implicitly trusts every workspace you open, which defeats the protection entirely: a checked-out PR with a malicious.helix/config.tomlwould get its configuration loaded and any language server it defines launched, with no prompt and no indicator. Only set this if you accept full responsibility for what’s in every project directory youcdinto.
Trusting workspaces by path (discouraged)
If you keep all your repositories under a predictable layout, you can trust them in bulk with glob patterns instead of granting each workspace individually:
[editor.workspace-trust]
trusted = [
  "~/src/github.com/me/*",
  "~/work/repos/*",
]
A workspace whose path matches a pattern is trusted for everything, just
as if you had run :workspace-trust in it. ~ and environment variables
are expanded.
Warning
This is weaker than an explicit grant and is discouraged. It skips the
.helix/change detection entirely (a malicious checkout under a matched directory is never flagged as stale), and it trusts any repository that later lands under a matching path — including one you clone into~/src/github.com/me/from an untrusted source. Prefer granting trust per workspace; reach for this only if the prompts are genuinely disruptive to your workflow. An explicit:workspace-excludestill overrides a matching pattern.
Git trust
Workspace trust also gates how Helix opens git repositories. Untrusted
workspaces are opened in gix’s
Trust::Reduced mode; trusted workspaces use Trust::Full.
Under Trust::Reduced, gix still runs the full filter pipeline (so
built-in conversions like core.autocrlf keep working) but ignores
configuration coming from the untrusted, repository-local .git/config.
That means filter.*.clean / filter.*.smudge drivers and similar
keys that would otherwise execute external programs are dropped until you
trust the workspace.
Helix forces this trust level explicitly rather than letting gix infer it
from .git directory ownership — a malicious .git/config in a directory
you happen to own is still treated as untrusted until you run
:workspace-trust.
Ecosystem
This section has information related to the wider Helix ecosystem.
Migrating from Vim
Helix’s editing model is strongly inspired from Vim and Kakoune, and a notable
difference from Vim (and the most striking similarity to Kakoune) is that Helix
follows the selection → action model. This means that whatever you are
going to act on (a word, a paragraph, a line, etc.) is selected first and the
action itself (delete, change, yank, etc.) comes second. A cursor is simply a
single width selection.
Note: As Helix is inspired by Vim and Kakoune, the keybindings are similar but also have some differences. The content of this page is inspired by Kakoune Wiki.
NOTE: Unlike vim, f, F, t and T are not confined to the current line.
Delete/Change Commands
delete a word:
- vim:
dw - helix:
wd
change a word:
- vim:
cw - helix:
ecorwc(includes the whitespace after the word)
delete a character:
- vim:
x - helix:
dor;d(;reduces the selection to a single char)
copy a line:
- vim:
yy - helix:
Xy(Xextends all selections to whole lines)
global replace:
- vim:
:%s/word/replacement/g<ret> - helix:
%sword<ret>creplacement<esc>
Explanation: % selects the entire buffer, s opens a prompt for a regex, <ret> validates the regex and reduces the selection to each match (hence, all occurrences of word are selected). c deletes the selection contents and enter insert mode, replacement is typed and then <esc> goes back to normal mode.
Navigation
go to first line:
- vim:
gg - helix:
gg
go to last line:
- vim:
G - helix:
ge
go to line start:
- vim:
0 - helix:
gh
go to line first non-blank character:
- vim:
^ - helix:
gs
go to line end:
- vim:
$ - helix:
gl
jump to matching bracket:
- vim:
% - helix:
mm
Line Deletes
delete to line end:
- vim:
D - helix:
vgldort<ret>d
Note: v is used along with gl (go to line end), because gl does not select text.
t<ret> selects “’til” the newline represented by <ret>.
delete entire line:
- vim:
dd - helix:
xd
Note: x selects the entire line under the cursor
Comment lines, Completion, Search
auto complete:
- vim:
C-p - helix:
C-x
comment lines:
- vim:
gc - helix:
Space-c
search for the word under the cursor:
- vim:
* - helix:
A-o*n(if there’s a tree-sitter grammar or LSP) orbe*n
Explanation: if there’s a grammar or LSP, A-o expands selection to the parent syntax node (which would be the word in our case). Then * uses the current selection as the search pattern, and n goes to the next occurrence. b selects to the beginning of the word, and e selects to the end of the word, effectively selecting the whole word.
block selection:
- vim:
C-v, then expand your selection vertically and horizontally - helix: There’s no “block selection” mode, so instead you’d use multiple cursors. Expand your block selection vertically by adding new cursors on the line below with
C, and horizontally using standard movements
search “foo” and replace with “bar” in the current selection:
- vim:
:s/foo/bar/g<ret> - helix:
sfoo<ret>cbar<esc>,
Explanation: s will open a prompt in the command line for a regex, and select all matches inside the selection (effectively adding a new cursor on each match). Pressing enter will then finalise this step, and allow the c to change the selections to “bar”. When done, go back to normal mode with <esc>, and keep only the primary selection with , (remove all the additional cursors).
File actions
select the whole file:
- vim:
ggVG - helix:
%
reload a file from disk:
- vim:
:e<ret> - helix:
:reload<ret>(or:reload-all<ret>to reload all the buffers)
run shell command:
- vim:
:!command - helix:
:sh command(or!commandto insert its output into the buffer)
setting a bookmark (bookmarking a location):
- vim:
mato set bookmark with name a. Use`ato go back to this bookmarked location. - helix: there are no named bookmarks, but you can save a location in the jumplist with
C-s, then jump back to that location by opening the jumplist picker with<space>-j, or back in the jumplist withC-oand forward withC-i
Helix allows some limited movement in insert mode without switching to normal mode.
Unlike Vim, under Helix, the cursor shape is the same (block) in insert mode and normal mode by default. This can be adjusted in configuration:
[editor.cursor-shape]
insert = "bar"
TODO: Mention textobjects, surround, registers
Helix mode in other software
Helix’ keymap and interaction model (Using Helix) is easier to adopt if it can be used consistently in many editing contexts. Yet, certain use cases cannot easily be addressed directly in Helix. Similar to vim, this leads to the creation of “Helix mode” in various other software products, allowing Helix-style editing for a greater variety of use cases.
“Helix mode” is frequently still in early stages or missing entirely. For such cases, we also link to relevant bugs or discussions.
Other editors
| Editor | Plugin or feature providing Helix editing | Comments |
|---|---|---|
| Vim | helix.vim config | |
| IntelliJ IDEA / Android Studio | IdeaVim plugin + helix.idea.vim config | Minimum recommended version is IdeaVim 2.19.0. |
| Visual Studio | VsVim plugin + helix.vs.vim config | |
| Visual Studio Code | Dance extension, or its Helix fork | The Helix fork has diverged. You can also use the original Dance and tweak its keybindings directly (try this config). |
| Visual Studio Code | Helix for VS Code extension | |
| Zed | native via keybindings (Bug) | |
| CodeMirror | codemirror-helix | |
| Lite XL | lite-modal-hx | |
| Lapce | Requested: https://github.com/lapce/lapce/issues/281 |
Shells
| Shell | Plugin or feature providing Helix editing |
|---|---|
| Fish | Feature Request |
| Fish | fish-helix |
| Zsh | helix-zsh or zsh-helix-mode |
| Nushell | Feature Request |
Other software
| Software | Plugin or feature providing Helix editing. | Comments |
|---|---|---|
| Obsidian | Obsidian-Helix | Uses codemirror-helix listed above. |
Configuration
To override global configuration parameters, create a config.toml file located in your config directory:
- Linux and Mac:
~/.config/helix/config.toml - Windows:
%AppData%\helix\config.toml
💡 You can easily open the config file by typing
:config-openwithin Helix normal mode.
Example config:
theme = "onedark"

[editor]
line-number = "relative"
mouse = false

[editor.cursor-shape]
insert = "bar"
normal = "block"
select = "underline"

[editor.file-picker]
hidden = false
You can use a custom configuration file by specifying it with the -c or
--config command line argument, for example hx -c path/to/custom-config.toml.
You can reload the config file by issuing the :config-reload command. Alternatively, on Unix operating systems, you can reload it by sending the USR1
signal to the Helix process, such as by using the command pkill -USR1 hx.
Finally, you can have a config.toml and a languages.toml local to a project by putting it under a .helix directory in your repository.
Its settings will be merged with the configuration directory and the built-in configuration.
Editor
Editor
[editor]Section[editor.clipboard-provider]Section[editor.statusline]Section[editor.lsp]Section[editor.cursor-shape]Section[editor.file-picker]Section[editor.file-explorer]Section[editor.buffer-picker]Section[editor.auto-pairs]Section[editor.auto-save]Section[editor.search]Section[editor.whitespace]Section[editor.indent-guides]Section[editor.gutters]Section[editor.soft-wrap]Section[editor.smart-tab]Section[editor.inline-diagnostics]Section[editor.word-completion]Section[editor.workspace-trust]Section
[editor] Section
| Key | Description | Default |
|---|---|---|
scrolloff | Number of lines of padding around the edge of the screen when scrolling | 5 |
mouse | Enable mouse mode | true |
mouse-yank-register | Which register to use for mouse yanks. | * |
middle-click-paste | Middle click paste support | true |
default-yank-register | Default register used for yank/paste | '"' |
scroll-lines | Number of lines to scroll per scroll wheel step | 3 |
shell | Shell to use when running external commands | Unix: ["sh", "-c"]Windows: ["cmd", "/C"] |
line-number | Line number display: absolute simply shows each line’s number, while relative shows the distance from the current line. When unfocused or in insert mode, relative will still show absolute line numbers | "absolute" |
cursorline | Highlight all lines with a cursor | false |
cursorcolumn | Highlight all columns with a cursor | false |
continue-comments | if helix should automatically add a line comment token if you create a new line inside a comment. | true |
gutters | Gutters to display: Available are diagnostics and diff and line-numbers and spacer and code-action-hint, note that diagnostics also includes other features like breakpoints, 1-width padding will be inserted if gutters is non-empty | ["diagnostics", "spacer", "line-numbers", "spacer", "diff"] |
auto-completion | Enable automatic pop up of auto-completion | true |
path-completion | Enable filepath completion. Show files and directories if an existing path at the cursor was recognized, either absolute or relative to the current opened document or current working directory (if the buffer is not yet saved). Defaults to true. | true |
auto-format | Enable automatic formatting on save1 | true |
idle-timeout | Time in milliseconds since last keypress before idle timers trigger. | 250 |
completion-timeout | Time in milliseconds after typing a word character before completions are shown, set to 5 for instant. | 250 |
preview-completion-insert | Whether to apply completion item instantly when selected | true |
completion-trigger-len | The min-length of word under cursor to trigger autocompletion | 2 |
completion-replace | Whether to make completions always replace the entire word and not just the part before the cursor | false |
auto-info | Whether to display info boxes | true |
true-color | Whether to override automatic detection of terminal truecolor support in the event of a false negative | false |
undercurl | Whether to override automatic detection of terminal undercurl support in the event of a false negative | false |
rulers | List of column positions at which to display the rulers. Can be overridden by language specific rulers in languages.toml file | [] |
bufferline | Renders a line at the top of the editor displaying open buffers. Can be always, never or multiple (only shown if more than one buffer is in use) | "never" |
color-modes | Whether to color the mode indicator with different colors depending on the mode itself | false |
text-width | Maximum line length. Used for the :reflow command and soft-wrapping if soft-wrap.wrap-at-text-width is set | 80 |
workspace-lsp-roots | Directories relative to the workspace root that are treated as LSP roots. Should only be set in .helix/config.toml | [] |
default-line-ending | The line ending to use for new documents. Can be native, lf, crlf, ff, cr or nel. native uses the platform’s native line ending (crlf on Windows, otherwise lf). | "native" |
insert-final-newline | Whether to automatically insert a trailing line-ending on write if missing | true |
atomic-save | Whether to use atomic operations to write documents to disk. This prevents data loss if the editor is interrupted while writing the file, but may confuse some file watching/hot reloading programs. | true |
trim-final-newlines | Whether to automatically remove line-endings after the final one on write | false |
trim-trailing-whitespace | Whether to automatically remove whitespace preceding line endings on write | false |
popup-border | Draw border around popup, menu, all, or none | "none" |
indent-heuristic | How the indentation for a newly inserted line is computed: simple just copies the indentation level from the previous line, tree-sitter computes the indentation based on the syntax tree and hybrid combines both approaches. If the chosen heuristic is not available, a different one will be used as a fallback (the fallback order being hybrid -> tree-sitter -> simple). | "hybrid" |
jump-label-alphabet | The characters that are used to generate two character jump labels. Characters at the start of the alphabet are used first. | "abcdefghijklmnopqrstuvwxyz" |
end-of-line-diagnostics | Minimum severity of diagnostics to render at the end of the line. Set to disable to disable entirely. Refer to the setting about inline-diagnostics for more details | "hint" |
clipboard-provider | Which API to use for clipboard interaction. One of pasteboard (MacOS), wayland, x-clip, x-sel, win32-yank, termux, tmux, windows, termcode, none, or a custom command set. | Platform and environment specific. |
editor-config | Whether to read settings from EditorConfig files | true |
rainbow-brackets | Whether to render rainbow colors for matching brackets. Requires tree-sitter rainbows.scm queries for the language. | false |
kitty-keyboard-protocol | Whether to enable Kitty Keyboard Protocol. Can be enabled, disabled or auto | "auto" |
[editor.clipboard-provider] Section
Helix can be configured either to use a builtin clipboard configuration or to use a provided command.
For instance, setting it to use OSC 52 termcodes, the configuration would be:
[editor]
clipboard-provider = "termcode"
Alternatively, Helix can be configured to use arbitrary commands for clipboard integration:
[editor.clipboard-provider.custom]
yank = { command = "cat",  args = ["test.txt"] }
paste = { command = "tee",  args = ["test.txt"] }
primary-yank = { command = "cat",  args = ["test-primary.txt"] } # optional
primary-paste = { command = "tee",  args = ["test-primary.txt"] } # optional
For custom commands the contents of the yank/paste is communicated over stdin/stdout.
[editor.statusline] Section
Allows configuring the statusline at the bottom of the editor.
The configuration distinguishes between three areas of the status line:
[ ... ... LEFT ... ... | ... ... ... CENTER ... ... ... | ... ... RIGHT ... ... ]
Statusline elements can be defined as follows:
[editor.statusline]
left = ["mode", "spinner"]
center = ["file-name"]
right = ["diagnostics", "selections", "position", "file-encoding", "file-line-ending", "file-type"]
separator = "│"
mode.normal = "NORMAL"
mode.insert = "INSERT"
mode.select = "SELECT"
diagnostics = ["warning", "error"]
workspace-diagnostics = ["warning", "error"]
The [editor.statusline] key takes the following sub-keys:
| Key | Description | Default |
|---|---|---|
left | A list of elements aligned to the left of the statusline | ["mode", "spinner", "file-name", "read-only-indicator", "file-modification-indicator"] |
center | A list of elements aligned to the middle of the statusline | [] |
right | A list of elements aligned to the right of the statusline | ["diagnostics", "selections", "register", "position", "file-encoding"] |
separator | The character used to separate elements in the statusline | "│" |
mode.normal | The text shown in the mode element for normal mode | "NOR" |
mode.insert | The text shown in the mode element for insert mode | "INS" |
mode.select | The text shown in the mode element for select mode | "SEL" |
diagnostics | A list of severities which are displayed for the current buffer | ["warning", "error"] |
workspace-diagnostics | A list of severities which are displayed for the workspace | ["warning", "error"] |
The following statusline elements can be configured:
| Key | Description |
|---|---|
mode | The current editor mode (mode.normal/mode.insert/mode.select) |
spinner | A progress spinner indicating LSP activity |
file-name | The path/name of the opened file |
file-absolute-path | The absolute path/name of the opened file |
file-base-name | The basename of the opened file |
current-working-directory | The current working directory |
file-modification-indicator | The indicator to show whether the file is modified (a [+] appears when there are unsaved changes) |
file-encoding | The encoding of the opened file if it differs from UTF-8 |
file-line-ending | The file line endings (CRLF or LF) |
file-indent-style | The file indentation style |
read-only-indicator | An indicator that shows [readonly] when a file cannot be written |
total-line-numbers | The total line numbers of the opened file |
file-type | The type of the opened file |
diagnostics | The number of warnings and/or errors |
workspace-diagnostics | The number of warnings and/or errors on workspace |
selections | The primary selection index out of the number of active selections |
primary-selection-length | The number of characters currently in primary selection |
position | The cursor position |
position-percentage | The cursor position as a percentage of the total number of lines |
separator | The string defined in editor.statusline.separator (defaults to "│") |
spacer | Inserts a space between elements (multiple/contiguous spacers may be specified) |
version-control | The current branch name or detached commit hash of the opened workspace |
register | The current selected register |
code-action-hint | Indicator for when code actions are available |
[editor.lsp] Section
| Key | Description | Default |
|---|---|---|
enable | Enables LSP integration. Setting to false will completely disable language servers regardless of language settings. | true |
display-messages | Display LSP window/showMessage messages below statusline2 | true |
display-progress-messages | Display LSP progress messages below statusline2 | false |
auto-signature-help | Enable automatic popup of signature help (parameter hints) | true |
auto-document-highlight | Automatically highlight symbol references at the cursor | false |
display-inlay-hints | Display inlay hints3 | false |
inlay-hints-length-limit | Maximum displayed length (non-zero number) of inlay hints | Unset by default |
display-color-swatches | Show color swatches next to colors | true |
display-signature-help-docs | Display docs under signature help popup | true |
snippets | Enables snippet completions. Requires a server restart (:lsp-restart) to take effect after :config-reload/:set. | true |
goto-reference-include-declaration | Include declaration in the goto references popup. | true |
[editor.cursor-shape] Section
Defines the shape of cursor in each mode.
Valid values for these options are block, bar, underline, or hidden.
💡 Due to limitations of the terminal environment, only the primary cursor can change shape.
| Key | Description | Default |
|---|---|---|
normal | Cursor shape in normal mode | "block" |
insert | Cursor shape in insert mode | "block" |
select | Cursor shape in select mode | "block" |
[editor.file-picker] Section
Set options for file picker and global search. Ignoring a file means it is not visible in the Helix file picker and global search.
All git related options are only enabled in a git repository.
| Key | Description | Default |
|---|---|---|
hidden | Enables ignoring hidden files | true |
follow-symlinks | Follow symlinks instead of ignoring them | true |
deduplicate-links | Ignore symlinks that point at files already shown in the picker | true |
parents | Enables reading ignore files from parent directories | true |
ignore | Enables reading .ignore files | true |
git-ignore | Enables reading .gitignore files | true |
git-global | Enables reading global .gitignore, whose path is specified in git’s config: core.excludesfile option | true |
git-exclude | Enables reading .git/info/exclude files | true |
max-depth | Set with an integer value for maximum depth to recurse | Unset by default |
Ignore files can be placed locally as .ignore or put in your home directory as ~/.ignore. They support the usual ignore and negative ignore (unignore) rules used in .gitignore files.
Additionally, you can use Helix-specific ignore files by creating a local .helix/ignore file in the current workspace or a global ignore file located in your Helix config directory:
- Linux and Mac:
~/.config/helix/ignore - Windows:
%AppData%\helix\ignore
Example:
# unignore in file picker and global search
!.github/
!.gitignore
!.gitattributes
[editor.file-explorer] Section
In addition to the options for the file picker and global search, a similar set of options is presented to configure the file explorer separately. However, unlike the file picker, the defaults are set to avoid ignoring most files.
Note that the ignore files consulted by the file explorer when ignore is set to true are the same ones used by the file picker, including the aforementioned Helix-specific ignore files.
| Key | Description | Default |
|---|---|---|
hidden | Enables ignoring hidden files | false |
follow-symlinks | Follow symlinks instead of ignoring them | false |
parents | Enables reading ignore files from parent directories | false |
ignore | Enables reading .ignore files | false |
git-ignore | Enables reading .gitignore files | false |
git-global | Enables reading global .gitignore, whose path is specified in git’s config: core.excludesfile option | false |
git-exclude | Enables reading .git/info/exclude files | false |
flatten-dirs | Enables flattening single child directories | true |
[editor.buffer-picker] Section
Set options for buffer picker.
| Key | Description | Default |
|---|---|---|
start-position | Controls behavior for which buffer is initially selected | current |
Example
[editor.buffer-picker]
start-position = "previous"
[editor.auto-pairs] Section
Enables automatic insertion of pairs to parentheses, brackets, etc. Can be a simple boolean value, or a specific mapping of pairs of single characters.
To disable auto-pairs altogether, set auto-pairs to false:
[editor]
auto-pairs = false # defaults to `true`
The default pairs are (){}[]’’“”``, but these can be customized by
setting auto-pairs to a TOML table:
[editor.auto-pairs]
'(' = ')'
'{' = '}'
'[' = ']'
'"' = '"'
'`' = '`'
'<' = '>'
Additionally, this setting can be used in a language config. Unless
the editor setting is false, this will override the editor config in
documents with this language.
Example languages.toml that adds <> and removes ''
[[language]]
name = "rust"

[language.auto-pairs]
'(' = ')'
'{' = '}'
'[' = ']'
'"' = '"'
'`' = '`'
'<' = '>'
[editor.auto-save] Section
Control auto save behavior.
| Key | Description | Default |
|---|---|---|
focus-lost | Enable automatic saving on the focus moving away from Helix. Requires focus event support from your terminal | false |
after-delay.enable | Enable automatic saving after auto-save.after-delay.timeout milliseconds have passed since last edit. | false |
after-delay.timeout | Time in milliseconds since last edit before auto save timer triggers. | 3000 |
[editor.search] Section
Search specific options.
| Key | Description | Default |
|---|---|---|
smart-case | Enable smart case regex searching (case-insensitive unless pattern contains upper case characters) | true |
wrap-around | Whether the search should wrap after depleting the matches | true |
[editor.whitespace] Section
Options for rendering whitespace with visible characters. Use :set whitespace.render all to temporarily enable visible whitespace.
| Key | Description | Default |
|---|---|---|
render | Whether to render whitespace. May either be all or none, or a table with sub-keys space, nbsp, nnbsp, tab, and newline | "none" |
characters | Literal characters to use when rendering whitespace. Sub-keys may be any of tab, space, nbsp, nnbsp, newline or tabpad | See example below |
Example
[editor.whitespace]
render = "all"
# or control each character
[editor.whitespace.render]
space = "all"
tab = "all"
nbsp = "none"
nnbsp = "none"
newline = "none"

[editor.whitespace.characters]
space = "·"
nbsp = "⍽"
nnbsp = "␣"
tab = "→"
newline = "⏎"
tabpad = "·" # Tabs will look like "→···" (depending on tab width)
[editor.indent-guides] Section
Options for rendering vertical indent guides.
| Key | Description | Default |
|---|---|---|
render | Whether to render indent guides | false |
character | Literal character to use for rendering the indent guide | "│" |
skip-levels | Number of indent levels to skip | 0 |
Example:
[editor.indent-guides]
render = true
character = "╎" # Some characters that work well: "▏", "┆", "┊", "⸽"
skip-levels = 1
[editor.gutters] Section
For simplicity, editor.gutters accepts an array of gutter types, which will
use default settings for all gutter components.
[editor]
gutters = ["diff", "diagnostics", "line-numbers", "spacer"]
To customize the behavior of gutters, the [editor.gutters] section must
be used. This section contains top level settings, as well as settings for
specific gutter components as subsections.
| Key | Description | Default |
|---|---|---|
layout | A vector of gutters to display | ["diagnostics", "spacer", "line-numbers", "spacer", "diff"] |
Example:
[editor.gutters]
layout = ["diff", "diagnostics", "line-numbers", "spacer"]
[editor.gutters.line-numbers] Section
Options for the line number gutter
| Key | Description | Default |
|---|---|---|
min-width | The minimum number of characters to use | 3 |
Example:
[editor.gutters.line-numbers]
min-width = 1
[editor.gutters.diagnostics] Section
Currently unused
[editor.gutters.diff] Section
The diff gutter option displays colored bars indicating whether a git diff represents that a line was added, removed or changed.
These colors are controlled by the theme attributes diff.plus, diff.minus and diff.delta.
Other diff providers will eventually be supported by a future plugin system.
There are currently no options for this section.
[editor.gutters.spacer] Section
Currently unused
[editor.gutters.code-action-hint] Section
The code-action-hint gutter option displays an indicator for whether a code action is available at current selection.
There are currently no options for this section.
[editor.soft-wrap] Section
Options for soft wrapping lines that exceed the view width:
| Key | Description | Default |
|---|---|---|
enable | Whether soft wrapping is enabled. | false |
max-wrap | Maximum free space left at the end of the line. | 20 |
max-indent-retain | Maximum indentation to carry over when soft wrapping a line. | 40 |
wrap-indicator | Text inserted before soft wrapped lines, highlighted with ui.virtual.wrap | "↪ " |
wrap-at-text-width | Soft wrap at text-width instead of using the full viewport size. | false |
Example:
[editor.soft-wrap]
enable = true
max-wrap = 25 # increase value to reduce forced mid-word wrapping
max-indent-retain = 0
wrap-indicator = ""  # set wrap-indicator to "" to hide it
[editor.smart-tab] Section
Options for navigating and editing using tab key.
| Key | Description | Default |
|---|---|---|
enable | If set to true, then when the cursor is in a position with non-whitespace to its left, instead of inserting a tab, it will run move_parent_node_end. If there is only whitespace to the left, then it inserts a tab as normal. With the default bindings, to explicitly insert a tab character, press Shift-tab. | true |
supersede-menu | Normally, when a menu is on screen, such as when auto complete is triggered, the tab key is bound to cycling through the items. This means when menus are on screen, one cannot use the tab key to trigger the smart-tab command. If this option is set to true, the smart-tab command always takes precedence, which means one cannot use the tab key to cycle through menu items. One of the other bindings must be used instead, such as arrow keys or C-n/C-p. | false |
Due to lack of support for S-tab in some terminals, the default keybindings don’t fully embrace smart-tab editing experience. If you enjoy smart-tab navigation and a terminal that supports the Enhanced Keyboard protocol, consider setting extra keybindings:
[keys.normal]
tab = "move_parent_node_end"
S-tab = "move_parent_node_start"

[keys.insert]
S-tab = "move_parent_node_start"

[keys.select]
tab = "extend_parent_node_end"
S-tab = "extend_parent_node_start"
[editor.inline-diagnostics] Section
Options for rendering diagnostics inside the text like shown below
fn main() {
  let foo = bar;
            └─ no such value in this scope
}
| Key | Description | Default |
|---|---|---|
cursor-line | The minimum severity that a diagnostic must have to be shown inline on the line that contains the primary cursor. Set to disable to not show any diagnostics inline. This option does not have any effect when in insert-mode and will only take effect 350ms after moving the cursor to a different line. | "warning" |
other-lines | The minimum severity that a diagnostic must have to be shown inline on a line that does not contain the cursor-line. Set to disable to not show any diagnostics inline. | "disable" |
prefix-len | How many horizontal bars ─ are rendered before the diagnostic text. | 1 |
max-wrap | Equivalent of the editor.soft-wrap.max-wrap option for diagnostics. | 20 |
max-diagnostics | Maximum number of diagnostics to render inline for a given line | 10 |
The allowed values for cursor-line and other-lines are: error, warning, info, hint.
The (first) diagnostic with the highest severity that is not shown inline is rendered at the end of the line (as long as its severity is higher than the end-of-line-diagnostics config option):
fn main() {
  let baz = 1;
  let foo = bar; a local variable with a similar name exists: baz
            └─ no such value in this scope
}
[editor.word-completion] Section
Options for controlling completion of words from open buffers.
| Key | Description | Default |
|---|---|---|
enable | Whether word completion is enabled | true |
trigger-length | Number of word characters to type before triggering completion | 7 |
Example:
[editor.word-completion]
enable = true
# Set the trigger length lower so that words are completed more often
trigger-length = 4
[editor.workspace-trust] Section
Controls implicit workspace trust. See the workspace trust chapter for the full feature.
| Key | Description | Default |
|---|---|---|
level | The default level of trust for every workspace. | "servers" |
prompt | Whether to show a modal when opening a file in an untrusted workspace. | true |
trusted | Glob patterns whose matching workspaces are trusted without a grant. | [] |
Example:
[editor.workspace-trust]
# Even if `false`, the statusline `[⚠]` indicator is still shown.
prompt = false

# "none":     prompt for every workspace.
# "servers":  trust LSP and DAP launches but still gate local config and git;
#             .helix/config.toml, .helix/languages.toml, etc. need :workspace-trust.
# "insecure": trust everything (discouraged).
level = "servers"

# Discouraged: skips .helix/ change detection and trusts anything that lands
# under a matching path. `~` and environment variables are expanded.
trusted = ["~/src/github.com/me/*"]
-
In most cases, you also need to enable the
auto-formatsetting underlanguages.toml. You can find the reasoning here. ↩ -
By default, a progress spinner is shown in the statusline beside the file path. ↩ ↩2
-
You may also have to activate them in the language server config for them to appear, not just in Helix. Inlay hints in Helix are still being improved on and may be a little bit laggy/janky under some circumstances. Please report any bugs you see so we can fix them! ↩
Themes
Themes
To use a theme add theme = "<name>" to the top of your config.toml file, or select it during runtime using :theme <name>.
Separate themes can be configured for light and dark modes. On terminals supporting mode 2031 dark/light detection, the theme mode is detected from the terminal.
[theme]
dark = "catppuccin_frappe"
light = "catppuccin_latte"
## Optional. Used if the terminal doesn't declare a preference.
## Defaults to the theme set for `dark` if not specified.
# fallback = "catppuccin_frappe"
Creating a theme
Create a file with the name of your theme as the file name (i.e mytheme.toml) and place it in your themes directory (i.e ~/.config/helix/themes or %AppData%\helix\themes on Windows). The directory might have to be created beforehand.
💡 The names “default” and “base16_default” are reserved for built-in themes and cannot be overridden by user-defined themes.
Overview
Each line in the theme file is specified as below:
key = { fg = "#ffffff", bg = "#000000", underline = { color = "#ff0000", style = "curl"}, modifiers = ["bold", "italic"] }
Where key represents what you want to style, fg specifies the foreground color, bg the background color, underline the underline style/color, and modifiers is a list of style modifiers. bg, underline and modifiers can be omitted to defer to the defaults.
To specify only the foreground color:
# Valid hex-color format is `#RGB` or `#RRGGBB`
# (each letter is a nibble)
key = "#ffffff"
If the key contains a dot '.', it must be quoted to prevent it being parsed as a dotted key.
"key.key" = "#fff"
Color values must be either a CSS hex RGB string or a name declared in the palette.
💡 Note that Helix doesn’t support transparency (alpha channel).
For inspiration, you can find the default theme.toml
here and
user-submitted themes
here.
The details of theme creation
Color palettes
It’s recommended to define a palette of named colors, and refer to them in the
configuration values in your theme. To do this, add a table called
palette to your theme file:
"ui.background" = "white"
"ui.text" = "black"

[palette]
white = "#ffffff"
black = "#000000"
Keep in mind that the [palette] table includes all keys after its header,
so it should be defined after the normal theme options.
The default palette uses the terminal’s default 16 colors, and the colors names
are listed below. The [palette] section in the config file takes precedence
over it and is merged into the default palette.
| Color Name |
|---|
default |
black |
red |
green |
yellow |
blue |
magenta |
cyan |
gray |
light-red |
light-green |
light-yellow |
light-blue |
light-magenta |
light-cyan |
light-gray |
white |
Modifiers
The following values may be used as modifier, provided they are supported by your terminal emulator.
| Modifier |
|---|
bold |
dim |
italic |
underlined |
slow_blink |
rapid_blink |
reversed |
hidden |
crossed_out |
💡 The
underlinedmodifier is deprecated and only available for backwards compatibility. Its behavior is equivalent to settingunderline.style="line".
Underline style
One of the following values may be used as a value for underline.style, providing it is
supported by your terminal emulator.
| Modifier |
|---|
line |
curl |
dashed |
dotted |
double_line |
Inheritance
Extend other themes by setting the inherits property to an existing theme.
inherits = "boo_berry"

# Override the theming for "keyword"s:
"keyword" = { fg = "gold" }

# Override colors in the palette:
[palette]
berry = "#2A2A4D"
Rainbow
The rainbow key is used for rainbow highlight for matching brackets.
The key is a list of styles.
rainbow = ["#ff0000", "#ffa500", "#fff000", { fg = "#00ff00", modifiers = ["bold"] }]
Colors from the palette and modifiers may be used.
Scopes
The following is a list of scopes available to use for styling:
Syntax highlighting
These keys match tree-sitter scopes.
When determining styling for a highlight, the longest matching theme key will be used. For example, if the highlight is function.builtin.static, the key function.builtin will be used instead of function.
This list is also the reference for the capture names used in highlights.scm queries (@function, @type, …) — see Adding languages. When several captures cover the same text the last matching pattern in the file wins; when they sit on nested nodes the innermost node wins regardless of order, so capture the leaf you mean (put @function on the called identifier, not a node wrapping it). A method call is @function.method; a field access with no call is @variable.other.member.
We use a similar set of scopes as Sublime Text. See also TextMate scopes.
-
attribute- Class attributes, HTML tag attributes -
type- Typesbuiltin- Primitive types provided by the language (int,usize)parameter- Generic type parameters (T)enumvariant- Enum variants
-
constructor- Constructors, struct/record literals, type names in value position -
constant(TODO: constant.other.placeholder for%v)builtinSpecial constants provided by the language (true,false,niletc)boolean
characterescape
numeric(numbers)integerfloat
-
string(TODO: string.quoted.{single, double}, string.raw/.unquoted)?regexp- Regular expressionsspecialpathurlsymbol- Erlang/Elixir atoms, Ruby symbols, Clojure keywords
-
comment- Code commentsline- Single line comments (//)documentation- Line documentation comments (e.g.///in Rust)
block- Block comments (e.g. (/* */)documentation- Block documentation comments (e.g./** */in Rust)
unused- Unused variables and patterns, e.g._and_foo
-
variable- Variablesmutable- Mutable variables (e.g. marked withmutin Rust)builtin- Reserved language variables (self,this,super, etc.)mutable- Mutable language variables (e.g.mut selfin Rust)
parameter- Function parametersmutable- Mutable function parameters (e.g. marked withmutin Rust)
othermember- Fields of composite data types (e.g. structs, unions)private- Private fields that use a unique syntax (currently just ECMAScript-based languages)
-
label-.class,#idin CSS, etc. -
punctuationdelimiter- Commas, colonsbracket- Parentheses, angle brackets, etc.special- String interpolation brackets.
-
keywordcontrolconditional-if,elserepeat-for,while,loopimport-import,exportreturnexception
operator-or,indirective- Preprocessor directives (#ifin C)function-fn,funcstorage- Keywords describing how things are storedtype- The type of something,class,function,var,let, etc.modifier- Storage modifiers likestatic,mut,const,ref, etc.
-
operator-||,+=,> -
function- Function definitions and callspublic- Public function definitionsbuiltin- Language built-in functionsmethod- Method definitions and calls (obj.method())public- Public method definitionsprivate- Private methods that use a unique syntax (currently just ECMAScript-based languages)
macro- Macro invocations (e.g.println!in Rust)special(preprocessor in C)
-
tag- Tags (e.g.<body>in HTML)builtin
-
namespace- Modules and namespaces (e.g.std::collections, package names) -
special-derivein Rust, bolded query-match in pickers (includes file explorer), etc. See also #2380 -
markupheadingmarker1,2,3,4,5,6- heading text for h1 through h6
listunnumberednumberedcheckedunchecked
bolditalicstrikethroughlinkurl- URLs pointed to by linkslabel- non-URL link referencestext- URL and image descriptions in links
quoterawinlineblock
-
diff- version control changesplus- additionsgutter- gutter indicator
minus- deletionsgutter- gutter indicator
delta- modificationsmoved- renamed or moved files/changesconflict- merge conflictsgutter- gutter indicator
-
embedded- Interpolated expressions embedded in a string template (${…})
Interface
These scopes are used for theming the editor interface:
markupnormalcompletion- for completion doc popup UIhover- for hover popup UI
headingcompletion- for completion doc popup UIhover- for hover popup UI
rawinlinecompletion- for completion doc popup UIhover- for hover popup UI
| Key | Notes |
|---|---|
ui.background | |
ui.background.separator | Picker separator below input line |
ui.cursor | |
ui.cursor.normal | |
ui.cursor.insert | |
ui.cursor.select | |
ui.cursor.match | Matching bracket etc. |
ui.cursor.primary | Cursor with primary selection |
ui.cursor.primary.normal | |
ui.cursor.primary.insert | |
ui.cursor.primary.select | |
ui.debug.breakpoint | Breakpoint indicator, found in the gutter |
ui.debug.active | Indicator for the line at which debugging execution is paused at, found in the gutter |
ui.gutter | Gutter |
ui.gutter.selected | Gutter for the line the cursor is on |
ui.linenr | Line numbers |
ui.linenr.selected | Line number for the line the cursor is on |
ui.statusline | Statusline |
ui.statusline.inactive | Statusline (unfocused document) |
ui.statusline.normal | Statusline mode during normal mode (only if editor.color-modes is enabled) |
ui.statusline.insert | Statusline mode during insert mode (only if editor.color-modes is enabled) |
ui.statusline.select | Statusline mode during select mode (only if editor.color-modes is enabled) |
ui.statusline.separator | Separator character in statusline |
ui.bufferline | Style for the buffer line |
ui.bufferline.active | Style for the active buffer in buffer line |
ui.bufferline.background | Style for bufferline background |
ui.popup | Documentation popups (e.g. Space + k) |
ui.popup.info | Prompt for multiple key options |
ui.picker.header | Header row area in pickers with multiple columns |
ui.picker.header.column | Column names in pickers with multiple columns |
ui.picker.header.column.active | The column name in pickers with multiple columns where the cursor is entering into. |
ui.window | Borderlines separating splits |
ui.help | Description box for commands |
ui.text | Default text style, command prompts, popup text, etc. |
ui.text.focus | The currently selected line in the picker |
ui.text.inactive | Same as ui.text but when the text is inactive (e.g. suggestions) |
ui.text.info | The key: command text in ui.popup.info boxes |
ui.text.directory | Directory names in prompt completion |
ui.text.symlink | Symlink names in prompt completion |
ui.virtual.ruler | Ruler columns (see the editor.rulers config) |
ui.virtual.whitespace | Visible whitespace characters |
ui.virtual.indent-guide | Vertical indent width guides |
ui.virtual.inlay-hint | Default style for inlay hints of all kinds |
ui.virtual.inlay-hint.parameter | Style for inlay hints of kind parameter (language servers are not required to set a kind) |
ui.virtual.inlay-hint.type | Style for inlay hints of kind type (language servers are not required to set a kind) |
ui.virtual.wrap | Soft-wrap indicator (see the editor.soft-wrap config) |
ui.virtual.jump-label | Style for virtual jump labels |
ui.menu | Code and command completion menus |
ui.menu.selected | Selected autocomplete item |
ui.menu.scroll | fg sets thumb color, bg sets track color of scrollbar |
ui.selection | For selections in the editing area |
ui.selection.primary | |
ui.highlight | Highlighted lines in the picker preview |
ui.highlight.frameline | Line at which debugging execution is paused at |
ui.cursorline.primary | The line of the primary cursor (if cursorline is enabled) |
ui.cursorline.secondary | The lines of any other cursors (if cursorline is enabled) |
ui.cursorcolumn.primary | The column of the primary cursor (if cursorcolumn is enabled) |
ui.cursorcolumn.secondary | The columns of any other cursors (if cursorcolumn is enabled) |
warning | Diagnostics warning (gutter) |
warning.diagnostic.inline | The inline diagnostic for the warning severity |
error | Diagnostics error (gutter) |
error.diagnostic.inline | The inline diagnostic for the error severity |
info | Diagnostics info (gutter) |
info.diagnostic.inline | The inline diagnostic for the warning severity |
hint | Diagnostics hint (gutter) |
hint.diagnostic.inline | The inline diagnostic for the hint severity |
diagnostic | Diagnostics fallback style (editing area) |
diagnostic.hint | Diagnostics hint (editing area) |
diagnostic.info | Diagnostics info (editing area) |
diagnostic.warning | Diagnostics warning (editing area) |
diagnostic.error | Diagnostics error (editing area) |
diagnostic.unnecessary | Diagnostics with unnecessary tag (editing area) |
diagnostic.deprecated | Diagnostics with deprecated tag (editing area) |
tabstop | Snippet placeholder |
Key remapping
Key remapping
Helix currently supports one-way key remapping through a simple TOML configuration file. (More powerful solutions such as rebinding via commands will be available in the future).
There are three kinds of commands that can be used in keymaps:
- Static commands: commands like
move_char_rightwhich are usually bound to keys and used for movement and editing. A list of static commands is available in the Keymap documentation and in the source code inhelix-term/src/commands.rsat the invocation ofstatic_commands!macro. - Typable commands: commands that can be executed from command mode (
:), for example:write!. See the Commands documentation for a list of available typeable commands or theTypableCommandListdeclaration in the source code athelix-term/src/commands/typed.rs. - Macros: sequences of keys that are executed in order. These keybindings
start with
@and then list any number of keys to be executed. For example@miwcan be used to select the surrounding word. For now, macro keybindings are not allowed in keybinding sequences due to limitations in the way that command sequences are executed. Modifier keys (e.g. Alt+o) can be used like"<A-o>", e.g."@miw<A-o>"
To remap keys, create a config.toml file in your helix configuration
directory (default ~/.config/helix on Linux systems) with a structure like
this:
💡 To set a modifier + key as a keymap, type
A-X = ...orC-X = ...for Alt + X or Ctrl + X. Combine with Shift using a dash, e.g.C-S-esc. Within macros, wrap them in<>, e.g.<A-X>and<C-X>to distinguish from theAorCkeys.
# At most one section each of 'keys.normal', 'keys.insert' and 'keys.select'
[keys.normal]
C-s = ":w" # Maps Ctrl-s to the typable command :w which is an alias for :write (save file)
C-o = ":open ~/.config/helix/config.toml" # Maps Ctrl-o to opening of the helix config file
a = "move_char_left" # Maps the 'a' key to the move_char_left command
w = "move_line_up" # Maps the 'w' key move_line_up
"C-S-esc" = "extend_line" # Maps Ctrl-Shift-Escape to extend_line
g = { a = "code_action" } # Maps `ga` to show possible code actions
"ret" = ["open_below", "normal_mode"] # Maps the enter key to open_below then re-enter normal mode
"A-x" = "@x<A-d>" # Maps Alt-x to a macro selecting the whole line and deleting it without yanking it

[keys.insert]
"A-x" = "normal_mode"     # Maps Alt-X to enter normal mode
j = { k = "normal_mode" } # Maps `jk` to exit insert mode
Minor modes
Minor modes are accessed by pressing a key (usually from normal mode), giving access to dedicated bindings. Bindings can be modified or added by nesting definitions.
[keys.insert.j]
k = "normal_mode" # Maps `jk` to exit insert mode

[keys.normal.g]
a = "code_action" # Maps `ga` to show possible code actions

# invert `j` and `k` in view mode
[keys.normal.z]
j = "scroll_up"
k = "scroll_down"

# create a new minor mode bound to `+`
[keys.normal."+"]
m = ":run-shell-command make"
c = ":run-shell-command cargo build"
t = ":run-shell-command cargo test"
Special keys and modifiers
Ctrl, Shift and Alt modifiers are encoded respectively with the prefixes C-, S- and A-.
The Super key - the Windows/Linux
key or the Command key on Mac keyboards - is also supported when using a terminal emulator that
supports the enhanced keyboard protocol.
The super key is encoded with prefixes Meta-, Cmd- or Win-. These are all synonyms for the
super modifier - binding a key with a Win- modifier will mean it can be used with the
Windows/Linux key or the Command key.
[keys.normal]
C-s = ":write" # Ctrl and 's' to write
Cmd-s = ":write" # Cmd or Win or Meta and 's' to write
Special keys are encoded as follows:
| Key name | Representation |
|---|---|
| Backspace | "backspace" |
| Space | "space" |
| Return/Enter | "ret" |
| Left | "left" |
| Right | "right" |
| Up | "up" |
| Down | "down" |
| Home | "home" |
| End | "end" |
| Page Up | "pageup" |
| Page Down | "pagedown" |
| Tab | "tab" |
| Delete | "del" |
| Insert | "ins" |
| Null | "null" |
| Escape | "esc" |
| Less Than (<) | "lt" |
| Greater Than (>) | "gt" |
Keys can be disabled by binding them to the no_op command.
All other keys such as ?, !, - etc. can be used literally:
[keys.normal]
"?" = ":write"
"!" = ":write"
"-" = ":write"
Note: - can’t be used when combined with a modifier, for example Alt + - should be written as A-minus. A-- is not accepted.
Languages
Languages
Language-specific settings and settings for language servers are configured
in languages.toml files.
languages.toml files
There are three possible locations for a languages.toml file:
-
In the Helix source code, which lives in the Helix repository. It provides the default configurations for languages and language servers.
-
In your configuration directory. This overrides values from the built-in language configuration. For example, to disable auto-formatting for Rust:
# in <config_dir>/helix/languages.toml [language-server.mylang-lsp] command = "mylang-lsp" [[language]] name = "rust" auto-format = false -
In a
.helixfolder in your project. Language configuration may also be overridden local to a project by creating alanguages.tomlfile in a.helixfolder. Its settings will be merged with the language configuration in the configuration directory and the built-in configuration.
Language configuration
Each language is configured by adding a [[language]] section to a
languages.toml file. For example:
[[language]]
name = "mylang"
scope = "source.mylang"
injection-regex = "mylang"
file-types = ["mylang", "myl"]
comment-tokens = "#"
indent = { tab-width = 2, unit = "  " }
formatter = { command = "mylang-formatter" , args = ["--stdin"] }
language-servers = [ "mylang-lsp" ]
These configuration keys are available:
| Key | Description |
|---|---|
name | The name of the language |
language-id | The language-id for language servers, checkout the table at TextDocumentItem for the right id |
scope | A string like source.js that identifies the language. Currently, we strive to match the scope names used by popular TextMate grammars and by the Linguist library. Usually source.<name> or text.<name> in case of markup languages |
injection-regex | regex pattern that will be tested against a language name in order to determine whether this language should be used for a potential language injection site. |
file-types | The filetypes of the language, for example ["yml", "yaml"]. See the file-type detection section below. |
shebangs | The interpreters from the shebang line, for example ["sh", "bash"] |
roots | A set of marker files used for LSP working directory selection. Helix starts at the file, walks upward, and remembers the topmost i.e. last directory that contains a marker file. For example Cargo.lock, yarn.lock |
auto-format | Whether to autoformat this language when saving |
diagnostic-severity | Minimal severity of diagnostic for it to be displayed. (Allowed values: error, warning, info, hint) |
comment-tokens | The tokens to use as a comment token, either a single token "//" or an array ["//", "///", "//!"] (the first token will be used for commenting). Also configurable as comment-token for backwards compatibility |
block-comment-tokens | The start and end tokens for a multiline comment either an array or single table of { start = "/*", end = "*/"}. The first set of tokens will be used for commenting, any pairs in the array can be uncommented |
indent | The indent to use. Has sub keys unit (the text inserted into the document when indenting; usually set to N spaces or "\t" for tabs) and tab-width (the number of spaces rendered for a tab) |
language-servers | The Language Servers used for this language. See below for more information in the section Configuring Language Servers for a language |
grammar | The tree-sitter grammar to use (defaults to the value of name) |
formatter | The formatter for the language, it will take precedence over the lsp when defined. The formatter must be able to take the original file as input from stdin and write the formatted file to stdout. The filename of the current buffer can be passed as argument by using the %{buffer_name} expansion variable. See below for more information in the Configuring the formatter command |
soft-wrap | editor.softwrap |
text-width | Maximum line length. Used for the :reflow command and soft-wrapping if soft-wrap.wrap-at-text-width is set, defaults to editor.text-width |
rulers | Overrides the editor.rulers config key for the language. |
path-completion | Overrides the editor.path-completion config key for the language. |
word-completion | Overrides the editor.word-completion configuration for the language. |
workspace-lsp-roots | Directories (relative to the workspace root) that stop the upward root search early. Meant for project-specific hard overrides in a local .helix/config.toml; |
persistent-diagnostic-sources | An array of LSP diagnostic sources assumed unchanged when the language server resends the same set of diagnostics. Helix can track the position for these diagnostics internally instead. Useful for diagnostics that are recomputed on save. |
rainbow-brackets | Overrides the editor.rainbow-brackets config key for the language |
code-actions-on-save | List of LSP code actions to be run in order on save, for example ["source.organizeImports"] |
Project and LSP root selection
This is the model Helix uses:
- The workspace root is found once by walking upward from the current
working directory and picking the first directory that contains
.git,.svn,.jj, or.helix. If none are found, the current working directory is the workspace root. - Root markers (
roots) are used only for LSP root selection and are found by starting at the file, not the folder Helix was opened in. - We use the topmost directory that has a root marker (we stop the search at the workspace root).
- In most cases, root markers are enough. In some repos there are multiple
nested root markers and whether you want the inner or outer one is project
specific. For these situations, use
workspace-lsp-rootsto stop the search early in a particular directory. workspace-lsp-rootsis meant to be set in the project-specific config:$PROJECT/.helix/config.toml.
Interaction with required-root-patterns (a language_server configuration key):
- After the LSP root is selected, Helix checks for
required-root-patternsin that directory. If none match, the server is not started. - This is validation, not root detection.
File-type detection and the file-types key
Helix determines which language configuration to use based on the file-types key
from the above section. file-types is a list of strings or tables, for
example:
file-types = ["toml", { glob = "Makefile" }, { glob = ".git/config" }, { glob = ".github/workflows/*.yaml" } ]
When determining a language configuration to use, Helix searches the file-types with the following priorities:
- Glob: values in
globtables are checked against the full path of the given file. Globs are standard Unix-style path globs (e.g. the kind you use in Shell) and can be used to match paths for a specific prefix, suffix, directory, etc. In the above example, the{ glob = "Makefile" }config would match files with the nameMakefile, the{ glob = ".git/config" }config would matchconfigfiles in.gitdirectories, and the{ glob = ".github/workflows/*.yaml" }config would match anyyamlfiles in.github/workflowdirectories. Note that globs should always use the Unix path separator/even on Windows systems; the matcher will automatically take the machine-specific separators into account. If the glob isn’t an absolute path or doesn’t already start with a glob prefix,*/will automatically be added to ensure it matches for any subdirectory. - Extension: if there are no glob matches, any
file-typesstring that matches the file extension of a given file wins. In the example above, the"toml"config matches files likeCargo.tomlorlanguages.toml.
Configuring the formatter command
Command line expansions are supported in the arguments
of the formatter command. In particular, the %{buffer_name} variable can be passed as
argument to the formatter:
formatter = { command = "mylang-formatter" , args = ["--stdin", "--stdin-filename", "%{buffer_name}"] }
Configuring code actions on save
The code-actions-on-save key lists LSP code actions to run (in order) when
the buffer is saved. The available actions depend on available language servers,
below are common examples and may need adjusting for your setup.
# Python with ruff
[[language]]
name = "python"
code-actions-on-save = ["source.organizeImports", "source.fixAll"]

# TS/JS with tsserver
[[language]]
name = "typescript"
code-actions-on-save = ["source.addMissingImports.ts"]

# TS/JS with eslint
[[language]]
name = "javascript"
code-actions-on-save = ["source.fixAll.eslint", "source.organizeImports"]
Language Server configuration
Language servers are configured separately in the table language-server in the same file as the languages languages.toml
For example:
[language-server.mylang-lsp]
command = "mylang-lsp"
args = ["--stdio"]
config = { provideFormatter = true }
environment = { "ENV1" = "value1", "ENV2" = "value2" }

[language-server.efm-lsp-prettier]
command = "efm-langserver"

[language-server.efm-lsp-prettier.config]
documentFormatting = true
languages = { typescript = [ { formatCommand ="prettier --stdin-filepath ${INPUT}", formatStdin = true } ] }
These are the available options for a language server.
| Key | Description |
|---|---|
command | The name or path of the language server binary to execute. Binaries must be in $PATH |
args | A list of arguments to pass to the language server binary |
config | Language server initialization options |
timeout | The maximum time a request to the language server may take, in seconds. Defaults to 20 |
environment | Any environment variables that will be used when starting the language server { "KEY1" = "Value1", "KEY2" = "Value2" } |
required-root-patterns | A list of glob patterns to look for in the working directory of the lsp. The language server is only started if at least one of them is found. |
A format sub-table within config can be used to pass extra formatting options to
Document Formatting Requests.
For example, with typescript:
[language-server.typescript-language-server]
# pass format options according to https://github.com/typescript-language-server/typescript-language-server#workspacedidchangeconfiguration omitting the "[language].format." prefix.
config = { format = { "semicolons" = "insert", "insertSpaceBeforeFunctionParenthesis" = true } }
Configuring Language Servers for a language
The language-servers attribute in a language tells helix which language servers are used for this language.
They have to be defined in the [language-server] table as described in the previous section.
Different languages can use the same language server instance, e.g. typescript-language-server is used for javascript, jsx, tsx and typescript by default.
The definition order of language servers affects the order in the results list of code action menu.
In case multiple language servers are specified in the language-servers attribute of a language,
it’s often useful to only enable/disable certain language-server features for these language servers.
As an example, efm-lsp-prettier of the previous example is used only with a formatting command prettier,
so everything else should be handled by the typescript-language-server (which is configured by default).
The language configuration for typescript could look like this:
[[language]]
name = "typescript"
language-servers = [ { name = "efm-lsp-prettier", only-features = [ "format" ] }, "typescript-language-server" ]
or equivalent:
[[language]]
name = "typescript"
language-servers = [ { name = "typescript-language-server", except-features = [ "format" ] }, "efm-lsp-prettier" ]
Each requested LSP feature is prioritized in the order of the language-servers array.
For example, the first goto-definition supported language server (in this case typescript-language-server) will be taken for the relevant LSP request (command goto_definition).
The features diagnostics, code-action, completion, document-symbols and workspace-symbols are an exception to that rule, as they are working for all language servers at the same time and are merged together, if enabled for the language.
If no except-features or only-features is given, all features for the language server are enabled.
If a language server itself doesn’t support a feature, the next language server array entry will be tried (and so on).
The list of supported features is:
formatgoto-declarationgoto-definitiongoto-type-definitiongoto-referencegoto-implementationsignature-helphoverdocument-highlightcompletioncode-actiondocument-linksworkspace-commanddocument-symbolsworkspace-symbolsdiagnosticspull-diagnosticsrename-symbolinlay-hintsdocument-colorscall-hierarchy
Tree-sitter grammar configuration
The source for a language’s tree-sitter grammar is specified in a [[grammar]]
section in languages.toml. For example:
[[grammar]]
name = "mylang"
source = { git = "https://github.com/example/mylang", rev = "a250c4582510ff34767ec3b7dcdd3c24e8c8aa68" }
Grammar configuration takes these keys:
| Key | Description |
|---|---|
name | The name of the tree-sitter grammar |
source | The method of fetching the grammar - a table with a schema defined below |
Where source is a table with either these keys when using a grammar from a
git repository:
| Key | Description |
|---|---|
git | A git remote URL from which the grammar should be cloned |
rev | The revision (commit hash or tag) which should be fetched |
subpath | A path within the grammar directory which should be built. Some grammar repositories host multiple grammars (for example tree-sitter-typescript and tree-sitter-ocaml) in subdirectories. This key is used to point hx --grammar build to the correct path for compilation. When omitted, the root of repository is used |
Choosing grammars
You may use a top-level use-grammars key to control which grammars are
fetched and built when using hx --grammar fetch and hx --grammar build.
# Note: this key must come **before** the [[language]] and [[grammar]] sections
use-grammars = { only = [ "rust", "c", "cpp" ] }
# or
use-grammars = { except = [ "yaml", "json" ] }
When omitted, all grammars are fetched and built.
Guides
This section contains guides for adding new languages to Helix: language and grammar configuration, and the tree-sitter query files that drive highlighting, power indentation, textobjects, symbol tags, and other features.
Adding languages
Adding new languages to Helix
In order to add a new language to Helix, you will need to follow the steps below.
Language configuration
- Add a new
[[language]]entry in thelanguages.tomlfile and provide the necessary configuration for the new language. For more information on language configuration, refer to the language configuration section of the documentation. A new language server can be added by extending the[language-server]table in the same file. - If you are adding a new language or updating an existing language server
configuration, run the command
cargo xtask docgento update the Language Support documentation.
💡 If you are adding a new Language Server configuration, make sure to update the Language Server Wiki with the installation instructions.
Grammar configuration
- If a tree-sitter grammar is available for the new language, add a new
[[grammar]]entry to thelanguages.tomlfile. - If you are testing the grammar locally, you can use the
source.pathkey with an absolute path to the grammar. However, before submitting a pull request, make sure to switch to usingsource.git.
Queries
-
In order to provide syntax highlighting and indentation for the new language, you will need to add queries.
-
Create a new directory for the language with the path
runtime/queries/<name>/. -
Refer to the tree-sitter website for more information on writing queries.
-
The highlight captures (
@function,@type, …) and how they resolve are documented on the themes page: match the most specific scope that fits, capture the leaf node you mean, and remember that the last matching pattern (and the innermost node) wins. -
Helix loads several query files from that directory; only
highlights.scmis required:File Purpose Guide highlights.scmsyntax highlighting highlights.md injections.scmembed other languages in regions (strings, code fences) injection.md indents.scmindentation indent.md textobjects.scmtextobjects and navigation ( mif,]f, …)textobject.md locals.scmscope tracking so locals highlight distinctly locals.md tags.scmdocument/workspace symbol pickers tags.md rainbows.scmrainbow brackets rainbow_bracket_queries.md A query file may reuse another language’s with
; inherits: <lang>on the first line. Runcargo xtask query-check [language]to check that the queries are valid against the grammar.
Common issues
- If you encounter errors when running Helix after switching branches, you may
need to update the tree-sitter grammars. Run the command
hx --grammar fetchto fetch the grammars andhx --grammar buildto build any out-of-date grammars. - If a parser is causing a segfault, or you want to remove it, make sure to
remove the compiled parser located at
runtime/grammars/<name>.so. - If you are attempting to add queries and Helix is unable to locate them, ensure that the environment variable
HELIX_RUNTIMEis set to the location of theruntimefolder you’re developing in. - Validate queries with
cargo xtask query-check [language](every query file must compile against the grammar).highlight-checkandindent-checkadditionally run the real highlighter and indenter over the test fixtures catch mistakes.
Adding highlight queries
Adding highlight queries
highlights.scm queries assign a highlight scope (@function, @type,
@keyword, …) to nodes in the syntax tree; the theme then maps each scope to a
colour. Highlighting is the one query file that every language needs.
Query files should be placed in runtime/queries/{language}/highlights.scm when
contributing to Helix.
Scopes
The full list of highlight scopes, and what each is for, is documented on the
themes page. Match the most specific scope that fits the node — for example a
method call is @function.method while a plain field access is
@variable.other.member.
A query file may reuse another language’s with ; inherits: <lang> on the first
line (for example tsx inherits typescript, which inherits ecma). An
inherited file is compiled against each inheriting grammar, so every capture
must be valid there too.
Precedence
Two rules decide which capture wins when more than one matches the same text:
- Same span: last match wins. Among captures covering the same bytes, the pattern that appears later in the file wins. Put a generic rule before the specific one that should override it.
- Nested nodes: innermost wins. When a parent and a child node both cover the text, the child’s capture wins, regardless of file order.
A common consequence of rule 2: capture the leaf you mean. A call captured on
a wrapping node loses to a base (identifier) @variable on the inner identifier,
so put @function on the identifier itself.
Where the grammar can’t distinguish a scope, casing is often used as a heuristic:
((identifier) @constant
 (#match? @constant "^[A-Z][A-Z_]*$"))
Testing
cargo xtask query-check [language] confirms the queries are valid against the
grammar. cargo xtask highlight-check [language] runs the real highlighter over
the fixtures in tests/query/highlights/<language-id>/<name>.<ext>, where a
caret comment line (// ^ @capture) asserts the winning scope at the column
above it; this catches the precedence mistakes that query-check cannot see.
cargo xtask highlight-check --dump <language> <file> prints the winning capture
per span for an arbitrary file.
Adding locals queries
Adding Locals Queries
locals.scm queries teach Helix about variable scopes and definitions so that
local variables can be highlighted distinctly from global ones. When a
@local.reference identifier is resolved to a @local.definition, it inherits
the highlight class of that definition rather than the class assigned by
highlights.scm.
Query files should be placed in runtime/queries/{language}/locals.scm when
contributing to Helix. Like other query files, locals.scm may reuse another
language’s with ; inherits: <lang> on the first line. Locals are resolved in
their own pass with their own precedence, independently of highlights.scm.
Captures
@local.scope
Marks a node as a scope boundary. Definitions are only visible to references that appear inside the same scope or a nested one. Typical scope nodes are function bodies and blocks.
[
  (function_definition)
  (block)
] @local.scope
@local.definition.*
Marks a name node as introducing a local symbol. The suffix after
@local.definition. becomes the highlight class applied to any reference that
resolves to this definition. For example, @local.definition.variable.parameter
causes matching references to be highlighted as variable.parameter.
(function_item
  (parameters
    (parameter
      pattern: (identifier) @local.definition.variable.parameter)))
Common suffixes mirror the highlight classes in highlights.scm:
variable, variable.parameter, variable.builtin, variable.mutable,
function, namespace, type, constant, etc.
@local.reference
Marks an identifier node as a potential reference to a local definition. Helix searches enclosing scopes for a matching definition and, if found, highlights the reference with that definition’s class instead.
(identifier) @local.reference
Discard captures
Any capture in locals.scm that is not @local.scope, @local.reference, or
@local.definition.* acts as a discard. It prevents a @local.reference from
being resolved at that node without affecting the highlights.scm result. This
is useful for identifier nodes that look like references but should not be
treated as variable references, for example keyword argument names or struct
field names in struct literals.
; Keyword argument names in a call are not variable references.
(keyword_argument
  name: (identifier) @_)
Later patterns in a query file have higher precedence than earlier ones. A
discard pattern must appear after the @local.reference pattern it is intended
to override. Placing it later ensures it takes precedence and cancels the
reference resolution for nodes it matches.
The convention is to use a capture name beginning with an underscore (e.g. @_,
@_keyword) to make the discard intent clear, but any non-@local.* name works.
How definitions and references are matched
Helix matches references to definitions by comparing the text of the reference
node against the text of definitions visible from the current scope. Definitions
in inner scopes shadow those in outer scopes. If no definition is found the
reference is left with its highlights.scm highlight.
Relationship with highlights.scm
The locals system runs alongside highlights.scm, not instead of it.
highlights.scm always determines the baseline highlight for a node.
locals.scm can override that highlight only when a @local.reference
successfully resolves to a @local.definition, and only for that specific
resolution. Non-@local.* captures in locals.scm (i.e. discards) have no
effect on highlights.scm results.
Adding textobject queries
Adding textobject queries
Helix supports textobjects that are language specific, such as functions, classes, etc.
These textobjects require an accompanying tree-sitter grammar and a textobjects.scm query file
to work properly. Tree-sitter allows us to query the source code syntax tree
and capture specific parts of it. The queries are written in a lisp dialect.
More information on how to write queries can be found in the official tree-sitter
documentation.
Query files should be placed in runtime/queries/{language}/textobjects.scm
when contributing to Helix. Note that to test the query files locally you should put
them under your local runtime directory (~/.config/helix/runtime on Linux
for example).
The following captures are recognized:
| Capture Name |
|---|
function.inside |
function.around |
class.inside |
class.around |
test.inside |
test.around |
parameter.inside |
parameter.around |
comment.inside |
comment.around |
entry.inside |
entry.around |
xml-element.inside |
xml-element.around |
Example query files can be found in the helix GitHub repository.
Queries for textobject based navigation
Tree-sitter based navigation in Helix is done using captures in the following order:
object.movementobject.aroundobject.inside
For example if a function.around capture has been already defined for a language
in its textobjects.scm file, function navigation should also work automatically.
function.movement should be defined only if the node captured by function.around
doesn’t make sense in a navigation context.
Adding indent queries
Adding indent queries
Helix uses tree-sitter to correctly indent new lines. This requires a
tree-sitter grammar and an indent.scm query file placed in
runtime/queries/{language}/indents.scm.
The indent level of a line is the number of @indent scopes that contain
it. An @indent capture on a node opens a scope spanning the lines after
the node’s first line through its last line; a line is indented once for every
such scope wrapping it. (A few capture types adjust this — @outdent cancels a
level, @align aligns to a column, etc. (see Capture types.)
Note that it matters where these scopes begin: multiple scopes that open on the same physical line only increase the indent by 1 (the same-line rule). See Capture types.
By default, Helix uses the hybrid indentation heuristic. This means that
indent queries are not used to compute the expected absolute indentation of a
line but rather the expected difference in indentation between the new and an
already existing line. This difference is then added to the actual indentation
of the already existing line. Since this makes errors in the indent queries
harder to find, it is recommended to disable it when testing via
:set indent-heuristic tree-sitter. The rest of this guide assumes that
the tree-sitter heuristic is used.
Indent queries
When Helix is inserting a new line through o, O, or <ret>, to determine
the indent level for the new line, the query in indents.scm is run on the
document. The starting position of the query is the end of the line above where
a new line will be inserted.
For o, the inserted line is the line below the cursor, so that starting
position of the query is the end of the current line.
#![allow(unused)]
fn main() {
fn need_hero(some_hero: Hero, life: Life) -> {
    matches!(some_hero, Hero { // ←─────────────────╮
        strong: true,//←╮  ↑  ↑                     │
        fast: true,  // │  │  ╰── query start       │
        sure: true,  // │  ╰───── cursor            ├─ traversal
        soon: true,  // ╰──────── new line inserted │  start node
    }) &&            //                             │
//  ↑                                               │
//  ╰───────────────────────────────────────────────╯
    some_hero > life
}
}
For O, the newly inserted line is the current line, so the starting position
of the query is the end of the line above the cursor.
#![allow(unused)]
fn main() {
fn need_hero(some_hero: Hero, life: Life) -> { // ←─╮
    matches!(some_hero, Hero { // ←╮          ↑     │
        strong: true,//    ↑   ╭───╯          │     │
        fast: true,  //    │   │ query start ─╯     │
        sure: true,  //    ╰───┼ cursor             ├─ traversal
        soon: true,  //        ╰ new line inserted  │  start node
    }) &&            //                             │
    some_hero > life //                             │
} // ←──────────────────────────────────────────────╯
}
From this starting node, the syntax tree is walked up to the root, collecting
every @indent/@outdent/@align/… capture on an ancestor. Each @indent
ancestor whose scope contains the line counts for one indent level (scopes
opening on the same line collapse to one); the capture types
describe the adjustments.
Capture types
@indent: Open an indent scope on this node — every line it contains is indented one more level. Scopes that open on the same line collapse: multiple@indentbeginning on one line only add 1. A node captured by both@indentand@outdentcontributes nothing (its level is cancelled) — used e.g. for a nestedelse ifthat should not stack a second level. By default the scope opens at the node’s own first line; see theheaderscope to open it at the parent (header) line instead.@outdent: Decrease by 1 the indent of the line on which this (usually a closing token like}/)/], or a keyword likeelse) begins.@indent.always: Like@indentbut does not collapse — multiple on the same line each add a level. The net level contribution is@indent.always−@outdent.always.@outdent.always: Like@outdentbut stacks, the counterpart to@indent.always.@align(default scopeall): Align everything inside this node to some anchor. The anchor is given by the start of the node captured by@anchorin the same pattern. Every pattern with an@alignshould contain exactly one@anchor. Indent (and outdent) for nodes below (in terms of their starting line) the@alignnode is added to the indentation required for alignment.@extend: Extend the range of this node to the end of the line and to lines that are indented more than the line that this node starts on. This is useful for languages like Python, where for the purpose of indentation some nodes (like functions or classes) should also contain indented lines that follow them.@extend.prevent-once: Prevents the first extension of an ancestor of this node. For example, in Python a return expression always ends the block that it is in. Note that this only stops the extension of the next@extendcapture. If multiple ancestors are captured, only the extension of the innermost one is prevented. All other ancestors are unaffected (regardless of whether the innermost ancestor would actually have been extended).@opaque: Mark a literal body such as a string, heredoc, or block comment. Lines that begin inside the captured node keep their existing indentation instead of being reindented, so the contents of multi-line literals are left untouched.
@indent / @outdent
Consider this example:
#![allow(unused)]
fn main() {
fn shout(things: Vec<Thing>) {
    //                       ↑
    //                       ├───────────────────────╮ indent level
    //                    @indent                    ├┄┄┄┄┄┄┄┄┄┄┄┄┄┄
    //                                               │
    let it_all = |out| { things.filter(|thing| { //  │      1
    //                 ↑                       ↑     │
    //                 ├───────────────────────┼─────┼┄┄┄┄┄┄┄┄┄┄┄┄┄┄
    //              @indent                 @indent  │
    //                                               │      2
        thing.can_do_with(out) //                    │
    })}; //                                          ├┄┄┄┄┄┄┄┄┄┄┄┄┄┄
  //↑↑↑                                              │      1
} //╰┼┴──────────────────────────────────────────────┴┄┄┄┄┄┄┄┄┄┄┄┄┄┄
// 3x @outdent
}
((block) @indent)
["}" ")"] @outdent
Note how on the second line two blocks open on the same line: since both scopes
begin on that line they collapse, for a net increase of 1. On the last line,
the three block scopes all contain it, but it begins with three @outdent }
tokens that cancel them, so the line lands back at the enclosing level.
Same-line collapse
The collapse above is a deliberate, load-bearing invariant:
A line is indented by one level per physical line on which a containing
@indentscope opens, not one level per scope. Several@indentscopes that open on the same line together add a single level.
This is what makes method/builder chains flatten instead of staircasing.
Grammars typically nest a chain so each .method() link is a call inside a
member_expression inside the previous link, and several of those nodes begin
on the receiver’s line:
#![allow(unused)]
fn main() {
let x = thing       // ← chain opens here
    .foo()          // each link aligned one level in,
    .bar()          // not progressively deeper
    .baz();
}
(call_expression) @indent
Even though many call_expression/member_expression scopes contain the
.bar() line, they all open on the thing line, so they collapse to a single
level and the continuation lines line up. Without the collapse, every link would
add a level and the chain would stair-step to the right.
If you instead want each scope to count even when several open on one line (for
example YAML’s “list item and map both start on the same line”) opt out with
@indent.always (described below), which does not collapse.
@extend / @extend.prevent-once
For an example of where @extend can be useful, consider Python, which is
whitespace-sensitive.
]
  (parenthesized_expression)
  (function_definition)
  (class_definition)
] @indent
class Hero:
    def __init__(self, strong, fast, sure, soon):#  ←─╮
        self.is_strong = strong #                     │
        self.is_fast = fast     # ╭─── query start    │
        self.is_sure = sure     # │ ╭─ cursor         │
        self.is_soon = soon     # │ │                 │
        #     ↑            ↑      │ │                 │
        #     │            ╰──────╯ │                 │
        #     ╰─────────────────────╯                 │
        #                                             ├─ traversal
    def need_hero(self, life):         #              │  start node
        return (                       #              │
            self.is_strong             #              │
            and self.is_fast           #              │
            and self.is_sure           #              │
            and self.is_soon           #              │
            and self > life            #              │
        ) # ←─────────────────────────────────────────╯
Without braces to catch the scope of the function, the smallest descendant of the cursor on a line feed ends up being the entire inside of the class. Because of this, it will miss the entire function node and its indent capture, leading to an indent level one too small.
To address this case, @extend tells helix to “extend” the captured node’s span
to the line feed and every consecutive line that has a greater indent level than
the line of the node.
(parenthesized_expression) @indent

]
  (function_definition)
  (class_definition)
] @indent @extend
class Hero:
    def __init__(self, strong, fast, sure, soon):#  ←─╮
        self.is_strong = strong #                     │
        self.is_fast = fast     # ╭─── query start    ├─ traversal
        self.is_sure = sure     # │ ╭─ cursor         │  start node
        self.is_soon = soon     # │ │ ←───────────────╯
        #     ↑            ↑      │ │
        #     │            ╰──────╯ │
        #     ╰─────────────────────╯
    def need_hero(self, life):
        return (
            self.is_strong
            and self.is_fast
            and self.is_sure
            and self.is_soon
            and self > life
        )
Furthermore, there are some cases where extending to everything with a greater
indent level may not be desirable. Consider the need_hero function above. If
our cursor is on the last line of the returned expression.
class Hero:
    def __init__(self, strong, fast, sure, soon):
        self.is_strong = strong
        self.is_fast = fast
        self.is_sure = sure
        self.is_soon = soon

    def need_hero(self, life):
        return (
            self.is_strong
            and self.is_fast
            and self.is_sure
            and self.is_soon
            and self > life
        ) # ←─── cursor
    #←────────── where cursor should go on new line
In Python, the are a few tokens that will always end a scope, such as a return
statement. Since the scope ends, so should the indent level. But because the
function span is extended to every line with a greater indent level, a new line
would just continue on the same level. And an @outdent would not help us here
either, since it would cause everything in the parentheses to become outdented
as well.
To help, we need to signal an end to the extension. We can do this with
@extend.prevent-once.
(parenthesized_expression) @indent

]
  (function_definition)
  (class_definition)
] @indent @extend

(return_statement) @extend.prevent-once
Brace-less bodies
A brace-less single-statement body — if (cond) with its statement on the next
line and no {} — is a body the indent must wrap, but the body node’s own
first line is the line that needs the indent (there is no separate opening line).
Capture the body and give it the header scope, which opens the
scope at the header (the captured node’s parent) line instead of the body’s
own line, so the body line is contained:
(if_statement
  consequence: (_) @indent
  (#not-kind-eq? @indent "compound_statement")
  (#set! "scope" "header"))
(while_statement
  body: (_) @indent
  (#not-kind-eq? @indent "compound_statement")
  (#set! "scope" "header"))
The query already names exactly the brace-less body (the consequence: /
body: field, with #not-kind-eq? skipping the braced form the surrounding
block indents), so the engine just opens that capture’s scope at its parent — it
does not itself inspect node kinds or field names. This works for a multi-line
brace-less body too (e.g. one returning a lambda). Give else and do / while
their own pattern (on the alternative / body field) so the trailing else /
while keyword line is not indented along with the body.
@indent.always / @outdent.always
As mentioned before, normally if there is more than one @indent or @outdent
capture on the same line, they are combined.
Sometimes, there are cases when you may want to ensure that every indent capture is additive, regardless of how many occur on the same line. Consider this example in YAML.
  - foo: bar
# ↑ ↑
# │ ╰─────────────── start of map
# ╰───────────────── start of list element
    baz: quux # ←─── cursor
    # ←───────────── where the cursor should go on a new line
    garply: waldo
  - quux:
      bar: baz
    xyzzy: thud
    fred: plugh
In YAML, you often have lists of maps. In these cases, the syntax is such that
the list element and the map both start on the same line. But we really do want
to start an indentation for each of these so that subsequent keys in the map
hang over the list and align properly. This is where @indent.always helps.
((block_sequence_item) @item @indent.always @extend
  (#not-one-line? @item))

((block_mapping_pair
    key: (_) @key
    value: (_) @val
    (#not-same-line? @key @val)
  ) @indent.always @extend
)
Predicates
In some cases, an S-expression cannot express exactly what pattern should be matched.
For that, tree-sitter allows for predicates to appear anywhere within a pattern,
similar to how #set! declarations work:
(some_kind
  (child_kind) @indent
  (#predicate? arg1 arg2 ...)
)
The number of arguments depends on the predicate that’s used.
Each argument is either a capture (@name) or a string ("some string").
The following predicates are supported by tree-sitter:
-
#eq?/#not-eq?: The first argument (a capture) must/must not be equal to the second argument (a capture or a string). -
#match?/#not-match?: The first argument (a capture) must/must not match the regex given in the second argument (a string). -
#any-of?/#not-any-of?: The first argument (a capture) must/must not be one of the other arguments (strings).
Additionally, we support some custom predicates for indent queries:
-
#not-kind-eq?: The kind of the first argument (a capture) must not be equal to the second argument (a string). -
#same-line?/#not-same-line?: The captures given by the 2 arguments must/must not start on the same line. -
#one-line?/#not-one-line?: The captures given by the fist argument must/must span a total of one line.
The header scope
By default an @indent scope opens at the captured node’s own first line, so the
lines inside it are indented and its first line is not. Sometimes the node you
must capture is the line that needs indenting — a brace-less body such as the
statement after if (cond) (see Brace-less bodies). For
this, set scope to header:
(if_statement
  consequence: (_) @indent
  (#not-kind-eq? @indent "compound_statement")
  (#set! "scope" "header"))
header opens the scope at the captured node’s parent (the if_statement
header) line instead of the node’s own line, so the body’s first line is
contained and indented. The query selects exactly the body, so the engine just
honours the annotation — it does not match on node kinds or field names itself.
(Older queries used tail / all scopes to control whether a node’s first line
was included; under the containment model those are no longer needed and have
been removed. header is the one scope the engine reads.)
Testing
cargo xtask indent-check [language] checks the queries against the fixtures in
tests/indent/<language-id>.<ext> in both modes: re-indenting each line
and simulating a newline typed after it, so a rule that is correct one way but
wrong the other is caught.
Adding injection queries
Adding Injection Queries
Writing language injection queries allows one to highlight a specific node as a different language. In addition to the standard language injection options used by tree-sitter, there are a few Helix specific extensions that allow for more control.
Injection drives more than highlighting: within an injected region Helix also
uses the injected language’s own indentation, textobjects, and comment tokens —
so, for example, editing JavaScript inside an HTML <script> indents and
comments as JavaScript.
An example of a simple query that would highlight all strings as bash in Nix:
((string_expression (string_fragment) @injection.content)
  (#set! injection.language "bash"))
Another example is this query, which highlights links in comments and keywords like “TODO”, by reusing the dedicated “comment” language:
((comment) @injection.content
  (#set! injection.language "comment"))
Capture Types
-
@injection.language(standard): The captured node may contain the language name used to highlight the node captured by@injection.content. -
@injection.content(standard): Marks the content to be highlighted as the language captured with@injection.languageet al. -
@injection.filename(extension): The captured node may contain a filename with a file-extension known to Helix, highlighting@injection.contentas that language. This uses the language extensions defined in both the default languages.toml distributed with Helix, as well as user defined languages. -
@injection.shebang(extension): The captured node may contain a shebang used to choose a language to highlight as. This also uses the shebangs defined in the default and userlanguages.toml.
Settings
-
injection.combined(standard): Indicates that all the matching nodes in the tree should have their content parsed as one nested document. -
injection.language(standard): Forces the captured content to be highlighted as the given language -
injection.include-children(standard): Indicates that the content node’s entire text should be re-parsed, including the text of its child nodes. By default, child nodes’ text will be excluded from the injected document. -
injection.include-unnamed-children(extension): Same asinjection.include-childrenbut only for unnamed child nodes.
Predicates
-
#eq?(standard): The first argument (a capture) must be equal to the second argument (a capture or a string). -
#match?(standard): The first argument (a capture) must match the regex given in the second argument (a string). -
#any-of?(standard): The first argument (a capture) must be one of the other arguments (strings).
Adding tags queries
Adding tags queries
See tree-sitter’s documentation on Code Navigation Systems for more background on tags queries.
Helix provides LSP-like features such as document and workspace symbol pickers
out-of-the-box for languages with tags.scm queries based on syntax trees. To
be analyzed a language must have a tree-sitter grammar and a tags.scm query
file which pattern matches interesting nodes from syntax trees.
Query files should be placed in runtime/queries/{language}/tags.scm
when contributing to Helix. You may place these under your local runtime
directory (~/.config/helix/runtime in Linux for example) for the sake of
testing.
Captures
@definition.*
Marks a node as a symbol definition. The following definition captures are recognized:
| Capture name |
|---|
definition.class |
definition.constant |
definition.enum |
definition.field |
definition.function |
definition.interface |
definition.macro |
definition.module |
definition.section |
definition.struct |
definition.type |
Captures outside this list are ignored by the symbol pickers, so map a language-specific construct onto the closest listed kind rather than inventing a new one.
@name
Marks the name identifier node within a match. @definition.* should capture
the entire definition node, and @name should capture the name identifier
within that same match:
(function_definition
  name: (identifier) @name) @definition.function

(class_definition
  name: (identifier) @name) @definition.class
@reference.*
Marks a node as a call site or type reference. These are used by workspace
symbol search to locate usages. @reference.call and @reference.class are
the common variants. As with definitions, @name captures the identifier:
(call
  function: (identifier) @name) @reference.call
Example query files can be found in the Helix GitHub repository.
Adding Rainbow Bracket Queries
Helix uses rainbows.scm tree-sitter query files to provide rainbow bracket
functionality.
Tree-sitter queries are documented in the tree-sitter online documentation. If you’re writing queries for the first time, be sure to check out the section on syntax highlighting queries and on query syntax.
Rainbow queries have two captures: @rainbow.scope and @rainbow.bracket.
@rainbow.scope should capture any node that increases the nesting level
while @rainbow.bracket should capture any bracket nodes. Put another way:
@rainbow.scope switches to the next rainbow color for all nodes in the tree
under it while @rainbow.bracket paints captured nodes with the current
rainbow color.
For an example, let’s add rainbow queries for the tree-sitter query (TSQ)
language itself. These queries will go into a
runtime/queries/tsq/rainbows.scm file in the repository root.
First we’ll add the @rainbow.bracket captures. TSQ only has parentheses and
square brackets:
["(" ")" "[" "]"] @rainbow.bracket
The ordering of the nodes within the alternation (square brackets) is not taken into consideration.
Angle brackets need care: < and > are usually comparison operators too, so
capturing them globally would rainbow-colour every comparison. Capture them only
within the generic node instead, which also marks that node as a scope:
(type_arguments ["<" ">"] @rainbow.bracket) @rainbow.scope
Note: Why are these nodes quoted? Most syntax highlights capture text surrounded by parentheses. These are named nodes and correspond to the names of rules in the grammar. Brackets are usually written in tree-sitter grammars as literal strings, for example:
{
  // ...
  arguments: $ => seq("(", repeat($.argument), ")"),
  // ...
}
Nodes written as literal strings in tree-sitter grammars may be captured in queries with those same literal strings.
Then we’ll add @rainbow.scope captures. The easiest way to do this is to
view the grammar.js file in the tree-sitter grammar’s repository. For TSQ,
that file is here. As we scroll down the grammar.js, we
see that the (alternation), (L36) (group) (L57), (named_node) (L59),
(predicate) (L87) and (wildcard_node) (L97) nodes all contain literal
parentheses or square brackets in their definitions. These nodes are all
direct parents of brackets and happen to also be the nodes we want to change
to the next rainbow color, so we capture them as @rainbow.scope.
[
  (group)
  (named_node)
  (wildcard_node)
  (predicate)
  (alternation)
] @rainbow.scope
This strategy works as a rule of thumb for most programming and configuration languages. Markup languages can be trickier and may take additional experimentation to find the correct nodes to use for scopes and brackets.
The :tree-sitter-subtree command shows the syntax tree under the primary
selection in S-expression format and can be a useful tool for determining how
to write a query.
Properties
The rainbow.include-children property may be applied to @rainbow.scope
captures. By default, all @rainbow.bracket captures must be direct descendant
of a node captured with @rainbow.scope in a syntax tree in order to be
highlighted. The rainbow.include-children property disables that check and
allows @rainbow.bracket captures to be highlighted if they are direct or
indirect descendants of some node captured with @rainbow.scope.
For example, this property is used in the HTML rainbow queries.
For a document like <a>link</a>, the syntax tree is:
(element                   ; <a>link</a>
  (start_tag               ; <a>
    (tag_name))            ; a
  (text)                   ; link
  (end_tag                 ; </a>
    (tag_name)))           ; a
If we want to highlight the <, > and </ nodes with rainbow colors, we
capture them as @rainbow.bracket:
["<" ">" "</"] @rainbow.bracket
And we capture (element) as @rainbow.scope because (element) nodes nest
within each other: they increment the nesting level and switch to the next
color in the rainbow.
(element) @rainbow.scope
But this combination of @rainbow.scope and @rainbow.bracket will not
highlight any nodes. <, > and </ are children of the (start_tag) and
(end_tag) nodes. We can’t capture (start_tag) and (end_tag) as
@rainbow.scope because they don’t nest other elements. We can fix this case
by removing the requirement that <, > and </ are direct descendants of
(element) using the rainbow.include-children property.
((element) @rainbow.scope
 (#set! rainbow.include-children))
With this property set, <, >, and </ will highlight with rainbow colors
even though they aren’t direct descendents of the (element) node.
rainbow.include-children is not necessary for the vast majority of programming
languages. It is only necessary when the node that increments the nesting level
(changes rainbow color) is not the direct parent of the bracket node.